Creating high-quality, game-ready visuals can be challenging without a structured approach. 3D & Unreal‑style prompt packs simplify this process by offering pre-tested templates designed to emulate the look and feel of Unreal Engine renders. These packs focus on technical elements like PBR materials, lighting, and camera settings, helping users produce consistent, polished keyframes for concept art, storyboards, and shotlists. Using a visual prompt planner can further streamline this pre-production phase. Whether you’re an indie developer or a designer working on cinematic sequences, these tools save time by eliminating the guesswork in prompt creation and ensuring uniformity across assets. Let’s dive into how these packs work and why they’re essential for efficient workflows.
How to Create Game-Ready Keyframes Using 3D Prompt Packs: A Step-by-Step Workflow
What Makes an AI Image Look Like a 3D/Unreal Engine Render?
Creating a game-ready keyframe involves more than just surface-level details. It requires prompts that incorporate the physics-based principles used in real-time engines. By focusing on these technical aspects, you can achieve both the photorealistic lighting and dynamic composition needed for a 3D scene that feels like it belongs in a game.
Core Visual Elements in 3D/Unreal-Style Prompts
At the heart of these prompts are Physically Based Rendering (PBR) materials. These materials rely on four specific maps - albedo, normal, roughness, and metallic - to replicate how light interacts with surfaces. For example, when you prompt for "metallic armor with high roughness" or "stone texture with parallax occlusion", you're guiding the AI to mimic the way surfaces behave under light, much like Unreal Engine 5's Lumen system.
"Lumen's global illumination responds naturally to PBR materials - accurate roughness and metallic values in your grass and stone textures directly affect how light bounces in the scene." – kungfury-sketch, Solo Developer, Texturize [3]
Another essential element is global illumination, which enhances realism by simulating the natural bounce of light across surfaces. Combining this with effects like volumetric fog or particles (dust, mist, smoke) adds atmospheric depth. To further refine the scene, use camera tokens such as "85mm lens, f/2.8" to introduce depth of field, which mimics real-world camera focus by blurring the background. Together, these elements create a visually engaging and technically sound composition suitable for game development.
Game-Ready Composition and Framing
A game-ready keyframe stands out because it’s clear and functional. Game-ready composition emphasizes legible silhouettes and balanced lighting, ensuring that characters, props, and environments are easy to identify and translate into a 3D workflow. Techniques like three-point lighting or rim lighting can enhance edge definition, making subjects stand out [5].
When working on character assets, including pose instructions ensures clean limb separation, which is vital for smooth rigging in game engines [2]. Additionally, maintaining a clear distinction between the subject and background simplifies extraction [2][4]. A well-framed keyframe should resemble a screenshot from an actual game, providing clarity and usability rather than just serving as a conceptual mood piece.
sbb-itb-997826f
Inside a 3D & Unreal‑Style Prompt Pack
A 3D & Unreal‑style prompt pack combines camera, lighting, and material tokens to help generate renders with an engine-like quality. These packs are designed to align with the technical requirements of AI models, using terms that replicate PBR workflows, real-world optics, and atmospheric depth.
How Prompt Packs Structure Camera, Lighting, and Materials
Camera settings in these packs are carefully detailed to imitate real lens behavior. They include precise focal lengths like 24mm, 35mm, 50mm, 85mm, and 100mm, alongside sensor sizes such as Full Frame 35mm or Super 35, to control depth of field. These settings mirror professional virtual camera tools, ensuring your outputs resemble authentic game screenshots.
Lighting tokens take a step beyond basic descriptors like "bright" or "dark." They incorporate advanced terms like volumetric lighting, chiaroscuro, God rays, and gobos (cookies), creating the layered, dynamic lighting effects often seen in Unreal Engine 5 demos. To avoid flat and overly digital results, packs also include texture-focused keywords such as heavy film grain, ISO 3200, and halation, adding realistic grain and rendering noise for a more natural look.
"Packs double as teaching tools so you can see which tokens control style, lighting, composition, and mood." – Art Prompt HQ [1]
Material and shader language is equally precise. Instead of vague descriptions, these packs use PBR terms like roughness, metallic, albedo, and parallax occlusion. For example, prompting for "brushed aluminum with high roughness" or "walnut with normal map detail" guides the AI to simulate how light interacts with surfaces in a game engine. This level of detail is critical for models like Unreal's Lumen, which calculates global illumination based on these material values.
In addition to technical settings, the packs also focus on environmental details to ensure assets are optimized for performance without sacrificing visual quality.
Environment Types and Detail Levels in Packs
These packs don’t stop at camera and lighting; they also address environment configurations to create visually engaging yet production-ready scenes. Professional packs predefine settings like wall textures, prop placements, and level-of-detail parameters to maintain practicality. For example, high-quality previsualizations often limit scenes to 100 props, 50 characters, and 10 lights [6], ensuring they remain manageable. The best packs adhere to these constraints, prioritizing clean, readable compositions over excessive clutter.
For game-ready assets, packs often specify LowPoly generation to create meshes optimized for real-time rendering. Some systems even separate geometry and texture generation, allowing for independent optimization of polygon-efficient models suited for engines like Unreal or Unity. Additionally, certain packs offer multi-view perspectives (front, back, left, right) to streamline 3D asset reconstruction.
For broader environmental needs, consider exploring landscape and environment packs or fantasy/sci‑fi worlds. These packs maintain the same technical precision while providing consistent, adaptable keyframes for various production workflows.
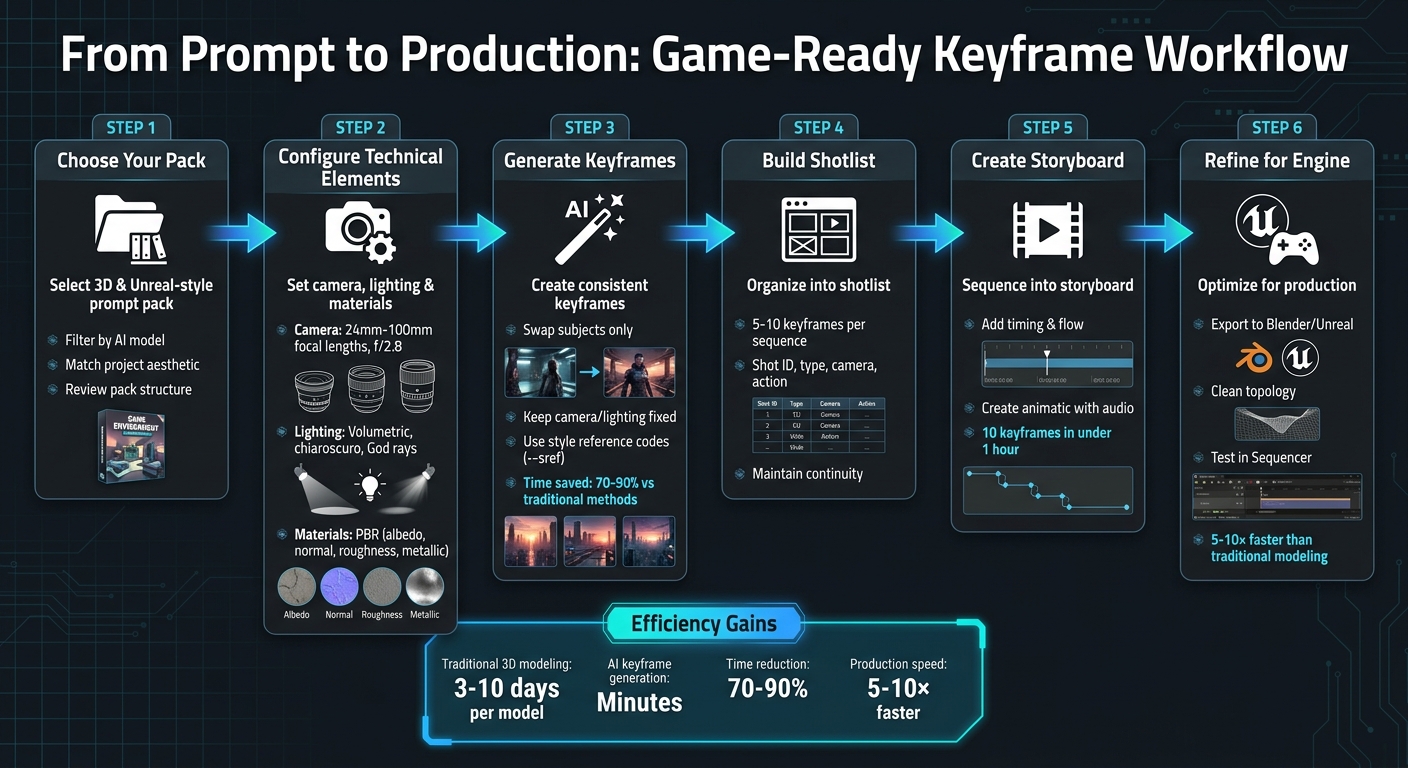
Using Prompt Packs to Generate Game‑Ready Keyframes
Prompt packs simplify the process of turning initial concepts into polished, game‑ready keyframes. Packs like 3D & Unreal‑style prompt packs act as guides for achieving specific visual styles, ensuring consistency across your creations[1]. Instead of relying on random, one-off results, these packs allow you to switch out subjects - be it characters, props, or environments - while maintaining consistent lighting, camera angles, and composition. This is especially useful when crafting cohesive keyframes that can be seamlessly integrated into game engines.
Creating Readable and Translatable Keyframes
Game‑ready keyframes should emphasize realistic lighting, reflections, and scale to ensure they are both visually appealing and functional for development teams[8]. Avoid overly stylized designs and focus on practical lighting that keeps details like skin tones natural and believable. It’s also important to leave a clear foreground area where characters or other key subjects can be easily placed.
To achieve professional framing and readable silhouettes, use specific camera tokens such as "85mm lens", "shallow depth of field," and "soft studio lighting"[1]. Adding elements like "atmospheric haze", "minimal movement," and "light variation" enhances realism, making environments feel grounded[8]. For consistent color and mood across multiple keyframes, stick to a structured prompt format that emphasizes lighting, camera settings, and atmosphere, adjusting only the subject tokens as needed[1].
Clean up your results using negative prompts to remove common AI-generated issues, such as extra limbs, blurriness, or watermarks, which can disrupt the overall composition[1]. To make your concepts fully adaptable, include setup notes detailing camera height, focal length, and post-processing settings[8]. This ensures your keyframes can be easily replicated or adapted across different AI tools and workflows.
Using Packs Across Midjourney, Stable Diffusion, and Other Models
Once you’ve established a strong keyframe structure, you can adapt these prompt packs to various AI platforms. Professional packs teach creators how specific tokens influence lighting, composition, and mood - valuable knowledge for translating AI-generated images into 3D environments[1]. For instance, understanding tokens like "volumetric lighting" or "chiaroscuro" allows you to modify Midjourney prompts for use in tools like Stable Diffusion or DALL‑E[1].
In Midjourney, features like Style Reference codes (--sref) and style weight parameters (--sw) help ensure that keyframes for characters, props, or environments maintain a unified aesthetic[[7]](https://promptsref.com/srefcodedetail/--sref 2341902373). When moving between platforms, prompt refiners and negative prompt tools can help eliminate artifacts while preserving a consistent visual style[1]. For concepts intended for real-time environments like Unreal Engine 5, focus on prompts that suggest "Lumen‑enabled" or "no baked lighting" to ensure compatibility with dynamic lighting setups[8].
Leverage a single pack’s framework to create a shotlist of 5–10 keyframes. Then, refine these using platform-specific tools to maintain consistency from the initial concept phase all the way to final implementation. This approach ensures a streamlined workflow and visually cohesive results.
From Keyframes to Shotlists and Storyboards
After generating a set of strong keyframes, the next step is to organize them into a shotlist or storyboard that clearly conveys your vision to your team. This is where prompt packs shine beyond creating single images - they serve as structured guides to ensure every frame in your sequence aligns with a consistent aesthetic, rather than feeling like a random assortment.
Building a Shotlist with Prompt Packs
Start by breaking your scene into distinct shots. A simple table can help, with columns for Shot ID (e.g., s01_sh03), Type (wide, medium, close-up), Camera (movement and lens, such as "Dolly in, 35mm"), Action (what’s happening on screen), and Continuity (wardrobe, props, lighting details).
Using a 3D & Unreal-style prompt pack as your base, you can maintain consistency by swapping only subject tokens while keeping camera settings, lighting, and composition the same. For example, if the pack specifies "85mm lens, f/2.8, volumetric fog, soft key light", use these settings across all 5–10 shots in your list. In tools like Midjourney, style reference codes can help you maintain this uniformity. Additionally, modern AI-to-Unreal workflows allow you to generate 3D meshes with full animation sets (e.g., idle, walk, run, jump) directly from your keyframes. These assets can then be tested in real-time using Unreal Engine 5’s Sequencer tool.
This method naturally transitions into creating a storyboard.
Creating Storyboard Concepts from AI Keyframes
Once your shotlist is ready, storyboards help bring your vision to life by focusing on timing and flow. For storyboards, prioritize atmosphere over intricate detail by using prompt packs that emphasize lighting and mood. Techniques like chiaroscuro, volumetric lighting, and bloom effects can add emotional depth to each storyboard panel.
"Stop prompting for objects, start prompting for physics - Lens types, aperture settings, and film stocks create realism, not adjectives like 'ultra-detailed.'"
Before investing in expensive video production, sequence your keyframes into a timed animatic with scratch audio. This step helps you spot pacing issues or missing transitions early, saving both time and resources. For characters that will be animated, include "T-pose" in your prompts to ensure clean geometry for rigging and to avoid issues like limb-blending artifacts. If your sequence involves UI elements, Unreal’s Grid Arrange modifier can help you precisely align text or logos, ensuring everything is readable and well-positioned.
These tools help bridge the gap between conceptualization and production, ensuring your keyframes evolve into assets ready for implementation. With a structured shotlist from a prompt pack, you can transform 10 keyframes into a cohesive storyboard in under an hour - much faster than traditional illustration methods [9].
Common Pitfalls with 3D‑Style Prompts (and How Packs Help)
Crafting engine-quality visuals with 3D-style prompts can be tricky, even for seasoned creators. One of the biggest challenges is the trial-and-error process - spending hours fine-tuning prompts to achieve a polished look, only to lose that precision on the next generation. Without a clear system, results often feel inconsistent and unreliable, making it hard to develop a repeatable workflow.
Avoiding Overly Complex or Impractical Results
AI-generated 3D models can sometimes look great on the surface but fail to meet practical requirements for game engines. Common issues include dense, unusable geometry, blurry or stretched textures, distorted anatomy, and surfaces lacking proper PBR (Physically Based Rendering) material definitions. Fixing these problems can take significant time, or worse, lead to scrapping assets entirely.
3D & Unreal‑style prompt packs help tackle these challenges by embedding engine-ready keywords directly into the prompts. Keywords like "low‑poly", "clean topology", "PBR textures", and "nanite geometry" guide the AI to produce functional assets instead of purely aesthetic ones. Negative prompts are also included to prevent common artifacts such as deformations or additional limbs. For character models, specifying T-pose ensures proper arm positioning, avoiding blending issues that can disrupt rigging and animation. This level of detail ensures that the generated assets are not only visually consistent but also technically sound.
Maintaining Consistency Across Multiple Keyframes
Another frequent challenge is maintaining uniformity across keyframes. When creating a shotlist or storyboard, adjusting prompts manually for every frame can lead to mismatched lighting, inconsistent materials, or conflicting color schemes, requiring tedious corrections down the line.
Curated prompt packs solve this by standardizing camera, lighting, and material settings, ensuring uniformity across all keyframes. These packs act as blueprints for specific aesthetics, allowing you to swap subjects while retaining a cohesive cinematic style. In tools like Midjourney, features such as style reference codes (--sref) and style weight (--sw) parameters further reinforce consistency, making the workflow smoother and more efficient. For those needing a quick starting point, hand-crafted prompt packs can further accelerate the creative process. By addressing these common pitfalls, you can create keyframes that serve as dependable building blocks for engine-ready visuals.
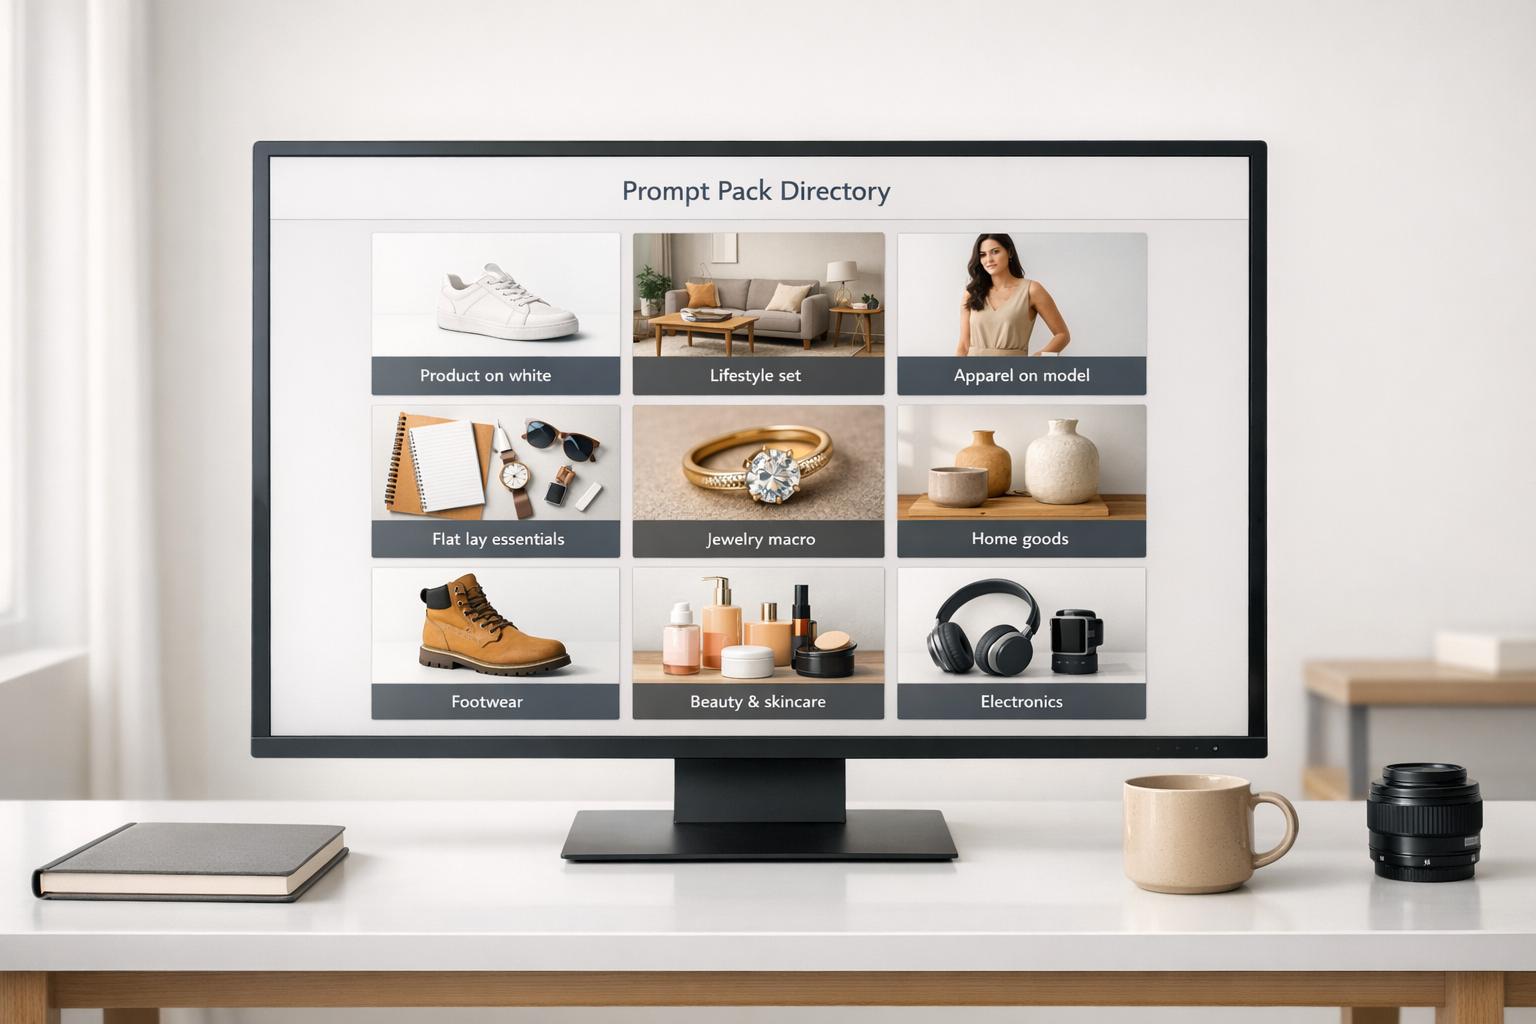
Where to Find 3D & Unreal-Style Prompt Packs on Art Prompt HQ
Creating visuals with an engine-like aesthetic starts with using well-crafted prompts. Art Prompt HQ organizes its prompt packs by Model, Style, and Goal, making it easier to locate resources for producing high-quality, engine-inspired imagery [1]. The 3D & Unreal‑style prompt packs section is a go-to resource for packs that focus on digital rendering, depth, and precise PBR materials. For projects with thematic elements, the fantasy and sci‑fi packs often complement 3D visuals, particularly for character keyframes or immersive game environments. This thoughtful categorization simplifies the search for the right tools.
Key Categories for 3D/Unreal-Style Packs
In addition to the main 3D category, several other groups cater to different needs in game development and visual design:
- Goals: These packs are tailored for various stages of game development, streamlining the process of creating keyframes and visual assets.
- Portfolio Packs: Perfect for crafting high-impact "hero" images, these are great for pitching ideas or building a professional visual library.
- Commercial Packs: Designed for professional workflows, these packs ensure consistent, on-brand outputs across multiple keyframes, making them ideal for storyboarding or creating shotlists.
- Master Systems: For advanced users, these packs serve as blueprints, offering insights into how specific tokens influence lighting, composition, and mood. They allow you to maintain a consistent visual style while swapping out subjects.
You can also check out landscape and environment packs for world-building or portfolio‑ready shots when polished keyframes are needed for presentations. Each pack is structured to deliver predictable and reliable results, making it easier to incorporate them into your workflow.
Choosing the Right Pack for Your Project
To find the best fit for your needs, filter packs based on your AI model and the desired style. Whether you're in the exploratory phase or working on production-ready assets, tools like the AI Art Style Finder and AI Image Prompt Optimizer can help you refine your choices. Adjust parameters such as aspect ratios and quality settings to ensure your outputs meet high-resolution standards, turning your keyframes into dependable assets for any project.
Conclusion
Key Takeaways for Game‑Ready Keyframes
Using 3D & Unreal‑style prompt packs simplifies the process of creating engine-like visuals. These packs offer structured templates that help produce consistent, professional-quality imagery - whether you're visualizing a Cyberpunk city or a fantasy RPG setting [1]. The time-saving benefits are significant: while traditional 3D modeling can take 3–10 days per model [10], AI-generated keyframes allow for prototyping and iteration in mere minutes, cutting initial creation time by an impressive 70–90% [11]. By utilizing prompts that include details like PBR materials, camera angles, and lighting setups, you can achieve clear compositions and strong silhouettes, making them excellent visual references for further scene development. As filmmaker and creative director Olivier Hero Dressen aptly states:
"The difference between amateur AI art and professional results isn't talent or luck - it's knowledge" [5].
These packs also serve as excellent learning tools. They help creators understand how specific tokens impact AI outputs, enabling refinement across platforms like Midjourney, Stable Diffusion, and newer models such as Sora 2 or Veo 3 [1]. For teams working on shotlists or storyboards, maintaining uniformity in keyframes is crucial for visual consistency throughout a project. This knowledge not only enhances your current projects but also sets the stage for future creative exploration.
Next Steps: Browse and Experiment
With these strategies in mind, the next step is to put them into action. Start by exploring the 3D & Unreal‑style prompt packs on Art Prompt HQ, filtering options by your AI model and aesthetic preferences. Tools like the free AI Art Style Finder or Prompt Optimizer can help refine your ideas before committing to a specific pack [1]. If your focus is on environments, you might find landscape and environment packs or fantasy/sci‑fi worlds particularly useful. For high-impact visuals like hero shots or pitch decks, consider checking out portfolio‑ready packs.
Once you've generated base assets using AI, refine them further in tools like Blender or Unreal Engine for complete creative control [12]. This hybrid approach is 5–10× faster than traditional modeling methods and provides the flexibility needed to produce assets ready for production. For more tips and workflows, visit the Art Prompt HQ blog and start experimenting with packs that align with your project goals.
FAQs
What tokens make an AI image look 'Unreal/3D'?
Tokens that give an AI image an 'Unreal/3D' appearance often include terms like PBR materials (Physically Based Rendering), volumetric lighting, depth, cinematic framing, and camera angles reminiscent of game engines. These details work together to mimic the highly polished and realistic aesthetic seen in game engine renders.
How do I keep keyframes consistent across a shotlist?
To keep a shotlist visually consistent, pay attention to essential elements like silhouettes, composition, lighting, and color schemes. Incorporating 3D and Unreal-style prompt packs with well-defined parameters - such as camera angles, focal lengths, and lighting setups - can help maintain a cohesive aesthetic. By generating keyframes using the same or closely related prompts, you can achieve a unified style, which simplifies the process of translating these visuals into game scenes or cinematic sequences.
Can I use one prompt pack with both Midjourney and Stable Diffusion?
Yes, you can use the same prompt pack with both Midjourney and Stable Diffusion. Both tools are designed to handle structured prompts and style tokens, which helps maintain a consistent visual style across platforms.