If you’re tired of random, inconsistent AI-generated images, Midjourney prompt packs offer a structured solution. These curated collections of prompts, combined with precise parameters, help you create reliable, high-quality visuals for branding, portfolios, or social media. Instead of guessing or wasting time on trial-and-error, you can start with proven formulas tailored to your creative goals. This guide explains how to choose the right prompt packs, use key Midjourney settings, and build a repeatable workflow for consistent results.
What Are Midjourney Prompt Packs (and Why They Beat Random Prompts)
A Midjourney prompt pack is a thoughtfully organized collection of prompts designed to focus on specific styles, subjects, or creative goals. These packs follow a structured format - Subject > Details > Context > Style/Mood > Technical > Parameters - to help the AI prioritize key elements and deliver consistent, high-quality outputs [2].
Unlike random prompts, which often rely on vague descriptors like "stunning", "8k", or "detailed", prompt packs use precise language and technical terms. Advanced prompt construction techniques help avoid the pitfalls of random prompts can sometimes reduce image quality in newer Midjourney versions (V7 and V8) [2]. On the other hand, prompt packs incorporate cinematic lighting terms like "rim light" or "chiaroscuro", camera details such as "85mm lens" or "low angle shot", and specific parameters like --ar 3:2 or --s 100 [6]. This approach transforms Midjourney from a tool of chance into one of precision.
Some professional packs also include Style Reference (--sref) codes or "SREF Books", which act as shortcuts to complex aesthetics. These codes allow users to apply a specific visual style - like "90s grunge comic-book" or "minimalist product photography" - without needing lengthy descriptions [6]. This streamlined process is what separates expert workflows from trial-and-error methods. As Dmitrii Mashkin, founder of Artcoast Studio, puts it:
"The difference between an amateur and a pro isn't 'creativity.' It's Vocabulary." [6]
The real strength of prompt packs lies in their ability to deliver consistency and efficiency. Random prompts often feel like rolling dice, hoping for a lucky result. In contrast, prompt packs provide ready-to-use formulas that produce professional-grade visuals without hours of tweaking or experimentation on Discord [6]. For tasks like branded product shots, portfolio building, or social media designs, this level of predictability is vital. You can explore a range of curated systems on Midjourney prompt packs to bypass the trial-and-error phase entirely.
In short: Prompt packs turn Midjourney into a reliable creative tool, giving you control over style, subject, and technical quality from the start. This foundation opens the door to exploring the wide variety of prompt packs tailored for different needs.
sbb-itb-997826f
Types of Midjourney Prompt Packs (Styles, Subjects, Commercial Use, and More)
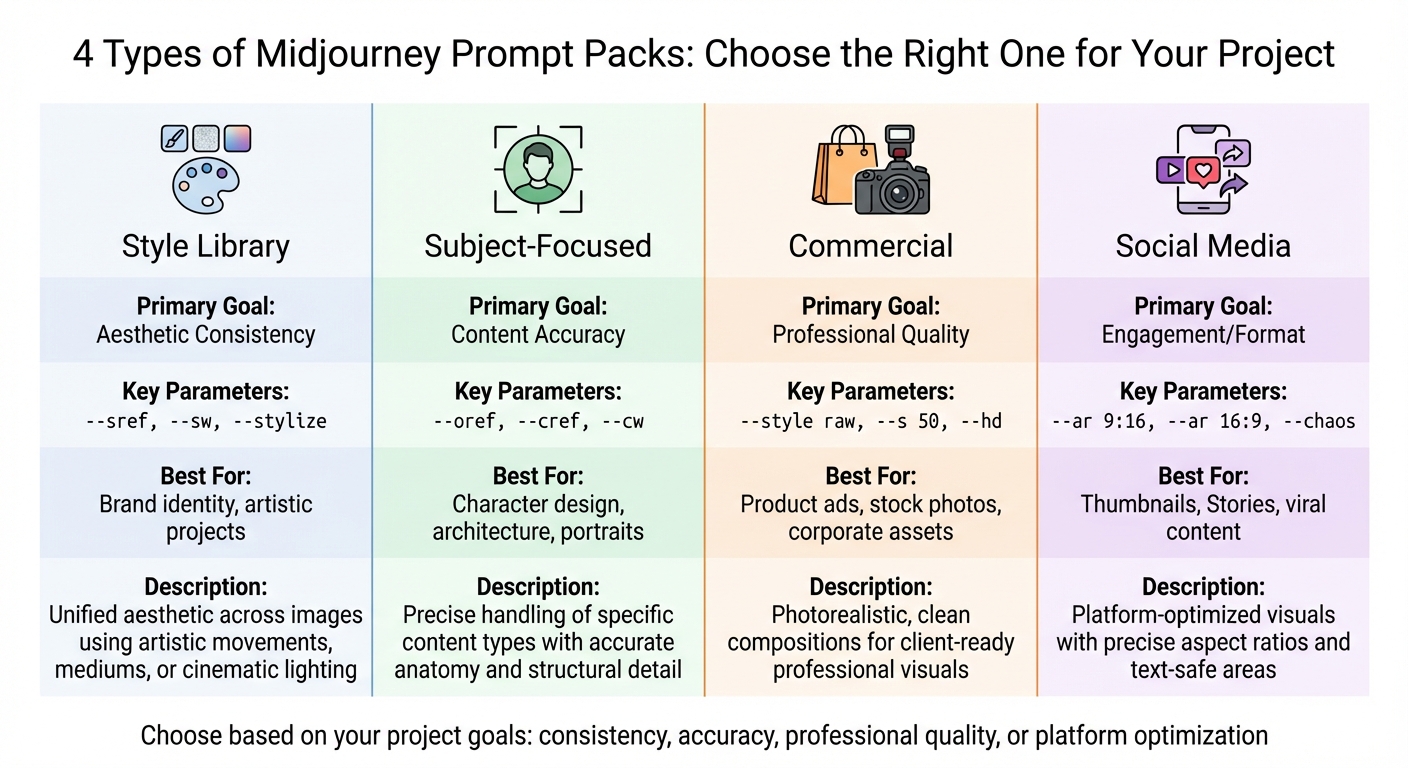
Midjourney Prompt Pack Types Comparison: Features and Best Use Cases
Prompt packs come in various forms, each tailored to specific creative needs. Some focus on visual aesthetics and mood, while others aim for precise subject representation. Choosing the right type ensures your project aligns with its goals, whether that's maintaining a consistent brand look, tackling complex subjects, or meeting platform-specific requirements.
Style Libraries
Style libraries are all about creating a unified aesthetic for your images. These packs draw inspiration from artistic movements (like Cubism or 60s Design), specific mediums (such as Pen and Ink or Flat Form), or even cinematic lighting techniques (like Rembrandt lighting or chiaroscuro) [6]. They often use parameters like --sref or --p to maintain a cohesive visual identity [2].
These packs are ideal when you know your subject but want to ensure a consistent look across various outputs. For instance, if you're working on a campaign that includes product shots, character designs, and social media posts, a style library helps tie everything together visually.
In practice: Style libraries are perfect for maintaining a consistent brand aesthetic across different types of content.
Subject-Focused Packs
Subject-focused packs are designed to handle specific types of content, such as portraits, architecture, animals, or products. They prioritize accuracy in anatomy, structure, and detail, making them especially useful for intricate subjects. In Midjourney V7 and V8, these packs often utilize the --oref (Omni Reference) parameter to ensure consistency in features like facial details or object shapes across multiple scenes [2].
These packs are most effective when precision is key. For example, a portrait pack can help avoid common AI errors like distorted hands or misaligned facial features. By using curated options, such as those listed in Midjourney prompt packs, you can save time and effort by skipping trial-and-error experimentation.
In practice: Subject-focused packs are reliable tools for creating detailed, accurate representations of complex subjects.
Commercial and Branding Packs
Commercial and branding packs cater to professional needs, such as product photography, stock visuals, client projects, and portfolio work. They focus on photorealism and clean, uncluttered compositions, avoiding excessive stylistic elements to ensure clarity. These packs often employ the --style raw parameter along with low stylization settings (like --s 50-100) for precise, polished results.
| Pack Type | Primary Goal | Key Parameters | Best For |
|---|---|---|---|
| Style Library | Aesthetic Consistency | --sref, --sw, --stylize |
Brand identity, artistic projects |
| Subject-Focused | Content Accuracy | --oref, --cref, --cw |
Character design, architecture, portraits |
| Commercial | Professional Quality | --style raw, --s 50, --hd |
Product ads, stock photos, corporate assets |
| Social Media | Engagement/Format | --ar 9:16, --ar 16:9, --chaos |
Thumbnails, Stories, viral content |
Commercial packs are your go-to for creating high-quality, client-ready visuals. With Midjourney V8 Alpha's native 2K resolution (introduced March 17, 2026) via the --hd parameter, these packs deliver sharp, detailed images without the need for external upscaling [2].
In practice: Commercial packs produce polished, professional visuals that require minimal post-production.
Social Media and Thumbnail Packs
Social media and thumbnail packs are tailored for digital engagement and platform-specific requirements. These packs focus on creating eye-catching visuals with precise aspect ratios, such as 9:16 for TikTok and Stories, 16:9 for YouTube, and 4:5 for Instagram. They also account for text-safe areas, making them ideal for overlays and call-to-action buttons. Parameters like --stylize and --weird are often used to add creative flair [2].
These packs are particularly useful when you need visuals optimized for specific platforms. For example, using --ar 4:5 for Instagram posts ensures your content takes up more screen space, increasing visibility. Additionally, with Midjourney V8 Alpha's faster image generation (up to 5x quicker than V7) [2], you can test multiple variations in less time.
In practice: Social media packs create ready-to-upload visuals that fit platform requirements without additional editing.
Key Midjourney Parameters You Need to Understand
Once you've set up your prompt packs for creative control, it's equally important to get a handle on the technical parameters that shape your results. These parameters are commands you add after your main prompt to control specific aspects like frame shape, style, or rendering detail. They always start with double dashes (--) and are added after the main text of your prompt, separated by a space. Without these adjustments, Midjourney's default settings may not align with your project's goals.
The --ar parameter defines the frame shape, such as --ar 16:9 for wide shots or --ar 4:5 for taller compositions. Wide ratios like --ar 16:9 are perfect for emphasizing environments, making them ideal for YouTube thumbnails. On the other hand, taller ratios like --ar 4:5 highlight the subject and work well for Instagram feeds.
Stylization (--s) determines how much creative interpretation Midjourney applies to your prompt. Lower values (0–100) stick closely to your instructions, while higher values (up to 1000) give the AI more freedom to experiment. For photorealistic results, try combining --style raw with --s 50 to reduce the "AI-generated" look [4][2]. When paired with well-structured prompt packs, these settings can turn your creative ideas into polished, professional visuals.
Chaos (--c) controls the variety among the generated images. A low value like 0 results in nearly identical variations, while higher values (50–100) produce more diverse interpretations. This is particularly helpful when brainstorming new ideas but less so when you need consistency [7][5].
Quality (--q) adjusts the rendering detail and time. As of March 2026, Midjourney V8 Alpha supports up to --q 4, which offers "extra coherence" but uses four times the GPU credits [2]. The seed parameter locks the initial noise pattern, allowing you to tweak prompts without introducing random changes [5][1].
For maintaining consistency across multiple images, reference parameters are invaluable. Use --sref to replicate an image's aesthetic or --oref to ensure a subject, like a character's facial features, remains consistent across scenes [7][2]. These tools are especially useful when working with prompt packs designed for a cohesive look. Nick Smith, CEO of Run The Prompts, explains:
"Parameters and proper prompting will help you refine the subtleties of your image and get things just right" [5].
How to Combine Prompt Packs with Parameters for Consistent Results
Pairing a well-organized prompt pack with the right settings creates a reliable workflow that delivers consistent, high-quality outputs. This approach eliminates much of the trial and error, making your process more efficient and predictable.
Testing Base Prompts from a Pack
Start by running a prompt from your pack exactly as written, without adding any parameters. This initial test gives you a sense of the pack's default quality and helps you understand the creator's intent. For instance, if you're using a portrait pack from Midjourney prompt packs, generate the prompt in its original form and observe the composition, lighting, and subject detail, typically in a 1:1 aspect ratio.
After this baseline test, note any areas that might need tweaking, such as framing or stylistic elements. These observations will inform how you adjust parameters in the next steps.
Adjusting Parameters to Refine Results
Once you've tested a base prompt, refine it by introducing parameters gradually. Begin with the aspect ratio (--ar) to suit your intended platform. For example:
- Use
16:9for YouTube thumbnails - Choose
4:5for Instagram posts - Opt for
2:3for portrait-oriented prints
If the prompts in your pack already use rich, descriptive language, keep the stylization parameter (--s) lower, around 50, for more literal results[2]. For commercial AI art prompts like product photography, combining --style raw with --s 50 can reduce automatic enhancements, allowing technical details like "shot on Leica M11" to stand out[2].
To maintain consistency across iterations, use the --seed parameter. This locks the initial noise pattern, making it easier to compare different refinements directly[5][1].
Example Combinations
Base prompt from pack:
"Close-up portrait of a woman in natural light, soft shadows, shot on Leica M11, shallow depth of field"
Iteration 1: Adjust Aspect Ratio
"Close-up portrait of a woman in natural light, soft shadows, shot on Leica M11, shallow depth of field" --ar 2:3
Iteration 2: Add Stylization Control
"Close-up portrait of a woman in natural light, soft shadows, shot on Leica M11, shallow depth of field" --ar 2:3 --s 150 --style raw
Iteration 3: Lock Consistency with Seed
"Close-up portrait of a woman in natural light, soft shadows, shot on Leica M11, shallow depth of field" --ar 2:3 --s 150 --style raw --seed 12345
For social media prompts, you might experiment with parameters like --ar 16:9 --s 600 --c 50 for creative compositions. Once you find a design you like, reduce chaos (--c 0) to refine the result further[2]. Meanwhile, if you're using portfolio AI art prompts for consistent character portrayal across multiple scenes, consider adding --oref [image URL] --ow 200. This will help maintain character likeness while allowing the pack to handle the surrounding environment and mood[2].
Building a Reusable Midjourney Workflow with Prompt Packs
Creating a structured workflow with prompt packs helps you develop a personal library of reliable formulas, perhaps by leveraging a comprehensive Midjourney prompts library, ensuring consistent, high-quality results for your projects.
Picking and Testing Prompt Packs
The first step is to select a Midjourney prompt pack that aligns with your project goals. For example, if you're working on photorealistic product shots for a client, explore options like commercial AI art prompts and choose one tailored to that need. If your focus is character work across multiple scenes, seek out packs that include Omni-Reference (--oref) support, which helps maintain subject consistency across renders [2].
Before diving in, test a few unmodified iterations to see if the pack delivers the results you’re after. Use Draft Mode (--draft) for this phase - it generates images 10× faster and at half the usual GPU cost, making it perfect for quick experimentation [9]. Once you find a pack that aligns with your vision, you’ve established a solid foundation for customization and refinement.
Saving Your Best Prompts and Settings
After identifying prompts that work well, save the configurations you’ve fine-tuned. When you’ve perfected a combination of prompts and parameters, use the /prefer option set command in Discord to save it under a short alias for easy future access [1]. For instance, a configuration like --ar 16:9 --s 250 --p can be saved as "youtube" to simplify your workflow.
To maintain a consistent aesthetic, consider building moodboards. Rate at least 200 images in Midjourney’s personalization section to create a stable visual profile, which can be applied across projects using --p [mID] [2]. You can even create separate profiles for different visual styles, allowing you to switch between them as needed.
For compositions you want to revisit or tweak, use the --seed parameter. This locks in the same base noise pattern (range: 0–4,294,967,295), enabling controlled adjustments without adding unnecessary randomness [5]. Save these seeds alongside your prompts to keep your workflow efficient and repeatable.
Creating a System for Efficiency
Once you’ve saved your best prompts and settings, organize them for maximum productivity. Group your saved configurations and prompt packs by project type or client. The Midjourney web interface’s Folders feature is particularly useful for categorizing your work into sections like "Product Photography", "Social Thumbnails", or "Portfolio Portraits" [7]. This organization makes it easy to revisit past projects and reuse successful setups.
For consistent results, structure your prompts in the following order: Subject → Details → Context → Style/Mood → Technical → Parameters. Since Midjourney prioritizes early tokens, starting with the subject ensures the AI focuses on the most critical elements [2]. Following this structure across all prompts reduces guesswork and speeds up your workflow.
If you stumble upon a successful aesthetic using --sref random, save the specific numeric code it generates for future use [9].
Common Mistakes When Using Packs and Settings (and How to Avoid Them)
Even seasoned users can run into trouble when they misuse prompt packs or parameters. Knowing these common pitfalls can help you avoid inconsistent results and wasted GPU credits on outputs that don’t meet your needs.
Overloading Parameters
Adding too many parameters to a single prompt often leads to chaotic and unpredictable outcomes. As Nick Smith, Founder and CEO of Run The Prompts, explains:
"High –chaos, –weird, and –stylize in one prompt can yield unpredictable results. Start simple, then iterate" [5].
Using high values for --chaos, --weird, and --stylize all at once in a Midjourney prompts bundle can overwhelm the AI, causing it to disregard your original prompt entirely [5]. Similarly, the --exp (Experimental) parameter can be tricky - values above 50 often override your personalization settings and deviate from the intended style of the pack [2][9]. For most projects, keeping --exp between 5 and 25 is a safer bet unless you’re deliberately experimenting with bold changes.
To get the best results, make adjustments one parameter at a time and use a fixed --seed to keep outputs consistent.
Misaligning with Pack Intent
Avoiding parameter overload is just the first step; it’s equally important to align your settings with the purpose of the pack. Prompt packs are crafted with specific goals in mind, and using them outside their intended context can undermine their effectiveness. For instance, if you’re working with a pack designed for precise, commercial product photography, applying high --stylize values (600+) will push the AI toward artistic outputs instead of the clean, professional results the pack is geared for [2][9].
Blake Crosley offers this advice:
"V7 understands natural language - write prompts like you're describing a photograph to a skilled cinematographer, not tagging a stock photo database" [2].
Older packs that rely on keyword-heavy prompts (e.g., "8k, masterpiece, hyper-detailed") can actually degrade performance in newer versions like V7 and V8, which are optimized for natural language descriptions [2]. Additionally, high --chaos values can disrupt the curated style cues of a pack, introducing unnecessary variation and reducing the consistency you’re aiming for [1][4].
Stick to the pack's recommended settings. For photorealistic or branding-focused packs, use --style raw or low stylize values (0–50) to maintain a clean look. For abstract or artistic packs, higher stylization works better - but always start with the suggested settings and tweak from there [2][9].
Relying on Version-Specific Commands
Another frequent mistake is building workflows around commands tied to specific Midjourney versions. Since Midjourney updates frequently, features and parameters can change or become obsolete overnight. For example, the --cref parameter, which worked for character consistency in V6, was replaced by --oref (Omni Reference) in V7 and V8 [2]. Users who relied on --cref found their workflows broken after the March 2026 V8 Alpha update.
Similarly, older parameters like --hd and --quality have evolved, and some Style Reference codes from V6 now require --sv 4 or --sv 6 flags to function in newer models [2][9]. Relying too heavily on version-specific syntax creates a fragile workflow that demands constant updates.
Focus on core functions rather than temporary commands. Understand what each parameter controls - whether it’s variation, resolution, or artistic interpretation - rather than memorizing exact syntax. Keep your prompts concise, ideally between 30 and 80 tokens, as overly detailed prompts (150+ tokens) can confuse the AI and lead to inconsistent results [2]. A well-structured prompt typically follows this order: Subject → Details → Context → Style → Parameters, with earlier tokens carrying more weight [2].
Parameters should enhance your workflow, not complicate it. Start with a well-designed pack, make small, deliberate changes, and respect the pack’s original design. This approach reduces troubleshooting and lets you focus on creating.
How to Find the Right Midjourney Prompt Packs on Art Prompt HQ
Once you've learned how to sidestep common mistakes, the next step is finding editable prompt packs tailored to your specific project goals. Art Prompt HQ simplifies this process by organizing Midjourney prompt packs into clear categories, helping you move from random experimentation to reliable systems.
Exploring Categories and Filters
Art Prompt HQ's categories make it easy to locate packs designed for specific styles or purposes. Whether you're focused on branding, product photography, logo creation, or building a portfolio, there's a category for you. For branding-related projects, check out the commercial AI art prompts section. If your goal is portfolio development, the portfolio AI art prompts category is a great place to start.
The style libraries are further divided into unique categories like Painters, Sculptors, Color Schemes, and Art Mediums. These include curated modifiers for well-known illustrators (e.g., Cicely Mary Barker, David Choe, Dan Hipp) and specialized mediums (e.g., Charred Wood Art, CCTV Footage, Carnival Glass) [3]. This structure provides access to professional terms for lighting, camera angles, and materials, saving you from wasting GPU credits on trial-and-error attempts [6]. After narrowing your options, you can refine your ideas further using the Midjourney Prompt Tool.
Using the Midjourney Prompt Tool
If you're still in the brainstorming phase or want to test ideas before committing to a pack, the Midjourney Prompt Tool is invaluable. It helps you experiment with different aspect ratios, levels of stylization, and subject combinations, providing a sandbox for refining natural-language descriptions. This tool works hand-in-hand with curated packs, offering a flexible way to explore ideas while building a repeatable workflow for Midjourney prompts.
Benefits of Curated Packs
Curated packs go beyond simple exploration - they deliver consistent, high-quality results. Instead of relying on vague keywords, these packs offer precise, pre-tested terms. Dmitrii Mashkin, Founder of Artcoast Studio, emphasizes this point:
"Pros treat Midjourney like a camera. The difference between an amateur and a pro isn't 'creativity.' It's Vocabulary" [6].
These packs include visual libraries with terms like "Rim Light" or "85mm lens", which can instantly enhance image quality [6]. Style Reference (SREF) packs, for instance, provide pre-tested codes to maintain aesthetic consistency across large projects, something unstructured prompts can't achieve [6][2]. Additionally, by starting drafts on more affordable models and finalizing on premium settings, you can cut costs from over 200 credits to roughly 40–60 credits per project [8]. Curated packs not only save time but also teach you the professional vocabulary and structure necessary to master AI art.
Ready to refine your Midjourney workflow? Explore curated Midjourney prompt packs for proven solutions, or try the Midjourney Prompt Tool to experiment and fine-tune your ideas before diving in.
FAQs
How do I pick the right Midjourney prompt pack for my goal?
When selecting a Midjourney prompt pack, think about the kind of images you aim to create and how they fit with your artistic vision. Packs centered on specific subjects, such as portraits or landscapes, can simplify your process and make it more efficient. Pay attention to the style, composition, and purpose you’re going for, and use the pack alongside key parameters like aspect ratio or stylization settings. This approach helps you fine-tune the results and maintain a consistent look.
Which parameters matter most for consistent results?
To get consistent results in Midjourney, pay attention to several important parameters:
- Aspect ratio (--ar): Defines the shape of your image.
- Seed (--seed): Ensures similar outputs by reproducing specific patterns.
- Stylization (--stylize or --s): Adjusts how artistic or abstract the image appears.
- Quality (--q): Controls the level of detail and resolution.
- Chaos (--chaos): Influences the degree of randomness in the output.
Balancing these settings carefully allows you to maintain a steady style and quality in your creations.
How can I keep the same character or product across images?
To keep a character or product consistent in Midjourney, start with a well-crafted prompt that specifies essential details such as facial features, attire, or unique characteristics. Pair this with seed values to manage randomness and use reference images to steer the AI in the right direction. For even greater precision across multiple images, advanced techniques like fine-tuning through tools like LoRA or DreamBooth can be highly effective.