When it comes to generating AI art, random prompts often lead to disappointing results - bland visuals, errors, or a lack of emotional connection. The solution? A structured process called iterative refinement. By starting with a basic idea and gradually adding details like subject, style, and lighting, you can create polished, high-quality images that align with your vision. This guide breaks down an 8-step checklist for refining prompts across tools like Midjourney, Stable Diffusion, and DALL·E. Whether you're crafting fantasy scenes or product visuals, this method ensures better control and consistency in your workflow. Let’s dive into the steps to transform rough ideas into production-ready prompts. For those focusing on environments, using a landscape prompt guide can further accelerate the refinement process.
Why Refinement Works Better Than Single-Try Prompts
How Iterative Refinement Works
Iterative refinement builds images step by step, starting with a base for the subject and environment before fine-tuning aspects like composition, lighting, mood, and technical details. By focusing on one variable at a time, this method removes the need for endless trial-and-error decisions.
This process mirrors workflows used by professionals in various fields. For instance, between mid-2025 and October 2025, fintech company Klarna created over 1,000 marketing images in just three months using tools like DALL·E, Midjourney, and Adobe Firefly. Instead of relying on single-shot prompts, they refined their outputs step by step, reducing their typical six-week production timeline to just one week [5]. Their success came from treating each generation as a checkpoint - locking in a promising result, tweaking one detail (like lighting or texture), and observing the effects before moving forward. This structured, layered approach forms the foundation of the 8-step checklist that follows. For those needing a head start, using a multi-category prompt pack can provide the base subjects needed for this refinement process.
Problems with Single-Try Prompts
While refinement allows for precise control, single-try prompts leave the AI guessing about countless details. What era? What style? What time of day? This often results in generic, uninspired images that fail to connect on an emotional level.
Unrefined prompts can also lead to visual contradictions. For example, combining terms like "realistic oil painting" confuses the AI, often producing unclear or muddled results. Real-world examples highlight the advantage of iterative refinement: in late 2025, fashion retailer Zalando shifted from single-try prompts to systematic refinement workflows. This change slashed their content creation costs by 90% and cut production timelines from weeks to just days [5]. The tools didn’t change - the shift came from removing guesswork and focusing on clear, staged instructions.
sbb-itb-997826f
Core Elements of a Strong Prompt
Main Prompt Components
A well-crafted prompt includes eight essential parts that provide clarity and precision, ensuring the desired outcome. The subject is the anchor - whether it’s a person, object, or character. To make it effective, use specific nouns and detailed descriptions, such as age, ethnicity, attire, or pose, rather than vague or abstract ideas [2][3]. Next is the action or scene, where dynamic verbs add movement and narrative [2][6].
The environment or context sets the stage, specifying the time period, location, and spatial relationships like "on", "beside", or "behind" [7][4]. Art style and medium shape the visual aesthetic, whether it’s digital art (e.g., vector, concept art), traditional techniques (like oil painting or watercolor), or photography (e.g., photorealistic) [2]. Composition and framing guide the perspective, covering factors like distance (close-up vs. wide shot), angle (e.g., low-angle, bird's-eye view), and compositional rules such as the Rule of Thirds [2][3].
Lighting and mood create atmosphere and evoke emotion through terms like "golden hour", "cinematic rim lighting", or "Rembrandt lighting" [2][4][3]. Quality and detail cues add technical precision with modifiers like "8K", "hyperdetailed", or specific engines such as "Unreal Engine 5" [2][4]. Lastly, negative prompts help exclude unwanted elements, such as "extra fingers", "watermarks", "text", or "blurry" outputs [2][3]. Models like FLUX and DALL·E 3 are most effective when the subject appears at the beginning of the prompt, as early tokens carry more weight [4].
Rough vs Refined Prompt Comparison
The difference between a rough prompt and a refined one lies in how much control you exert over the details. A rough prompt like "a cat" leaves the AI to fill in the gaps, guessing about breed, setting, lighting, and more. A refined prompt, such as "A realistic tabby cat sitting on a wooden fence at sunset with warm orange lighting" [7], eliminates ambiguity by specifying subject traits, environment, and mood. This clarity results in a more cohesive and visually appealing output.
| Rough Prompt | Refined Prompt | Impact on Output |
|---|---|---|
| "A cat" | "A realistic tabby cat sitting on a wooden fence at sunset with warm orange lighting" [7] | Adds subject details, environment, and lighting for a cohesive image. |
| "A mystical forest" | "A mystical forest with glowing mushrooms and a hidden waterfall, soft ambient light, macro lens, fantasy art, ethereal, 8K" [7] | Introduces specific style, focal points, and technical quality. |
| "A reading nook" | "Cozy reading nook by a bay window at golden hour, warm ambient lamplight, mid-century lounge chair with wool throw, floor-to-ceiling bookshelves, shallow depth of field, 4:5 aspect ratio" [6] | Defines mood, textures, lighting, and precise framing. |
| "A cyberpunk hacker" | "A 24-year-old Scandinavian male, intense focused expression, wearing an oversized matte-black techwear jacket with subtle neon-blue geometric stitching, holographic visor reflecting code matrices" [3] | Replaces a generic trope with detailed character design and high realism. |
This comparison highlights how refining prompts transforms vague ideas into detailed, high-quality outputs. For inspiration and examples, you can explore curated prompt packs that demonstrate these principles in action.
8-Step Prompt Refinement Checklist
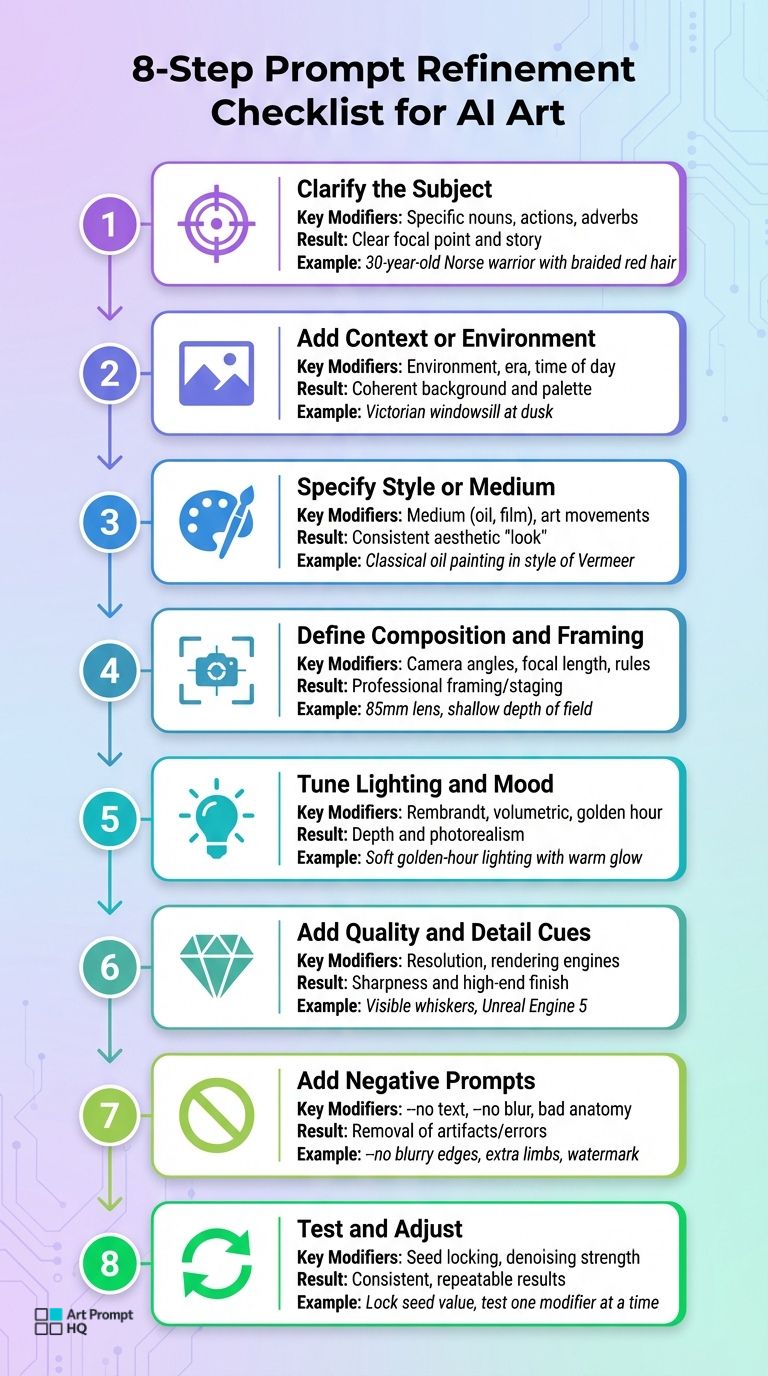
8-Step AI Art Prompt Refinement Checklist
Refining AI art prompts can make a huge difference in creating detailed, consistent, and visually appealing results. This step-by-step guide helps you transform rough ideas into polished, production-ready prompts. Each step builds upon the last, ensuring a structured approach to prompt refinement. You can follow the steps in order or focus on specific areas that need improvement.
Step 1: Clarify the Subject
Start by replacing vague terms with specific nouns and descriptors. For example, instead of saying "a warrior", try "a 30-year-old Norse warrior with braided red hair and leather armor." This level of detail minimizes ambiguity and ensures the subject is clearly defined. Always place the subject at the beginning of the prompt for better focus.
Step 2: Add Context or Environment
Set the scene by describing the background, time of day, or overall setting. Use spatial terms like "on", "beside", or "behind" for clarity. For instance, "a tabby cat" can become "a tabby cat sitting on a Victorian windowsill surrounded by potted geraniums at dusk." These details help establish mood and composition.
Step 3: Specify Style or Medium
Define the artistic medium or style to guide the AI’s interpretation. Whether it’s oil painting, watercolor, or digital art, specifying this prevents generic results. For example, "a tabby cat on a windowsill" could be refined into "a tabby cat on a windowsill, classical oil painting in the style of Vermeer." Avoid overloading prompts with too many style keywords.
Step 4: Define Composition and Framing
Composition determines how the subject and background interact. Use terms like "close-up", "wide shot", or "low-angle" to outline framing. For photorealistic results, include lens types (e.g., 85mm for portraits or 24mm for wide landscapes) and aperture settings (e.g., f/1.8 for shallow depth of field). For example, "a close-up of a tabby cat's face, 85mm lens, shallow depth of field, blurred background."
Step 5: Tune Lighting and Mood
Lighting plays a critical role in creating depth and atmosphere. Use terms like "Rembrandt lighting", "golden hour", or "volumetric god rays" to define the scene’s mood. For example, "a tabby cat on a windowsill in soft, golden-hour lighting with a warm orange glow" adds a professional touch.
Step 6: Add Quality and Detail Cues
To achieve sharp and detailed results, include specific technical terms. Instead of generic phrases, use photorealistic Stable Diffusion prompts that describe textures or features, such as "visible whiskers", "intricate gold embroidery", or "sharp focus on eyes." Mentioning rendering engines like "Octane Render" or "Unreal Engine 5" can also signal a high-quality finish.
Step 7: Add Negative Prompts
Negative prompts help eliminate unwanted elements. For example, "a tabby cat on a windowsill, --no blurry edges, extra objects, watermark, text, deformed anatomy" can reduce errors like extra limbs or artifacts. For models without a dedicated negative prompt field, describe what you want (e.g., "clean background") instead of what to avoid.
Step 8: Test and Adjust
Refinement is an iterative process. Test your prompt by adding one modifier at a time and tweak variables to achieve the desired outcome. Lock in successful compositions by setting a "seed" value, and run multiple generations to ensure consistent results.
| Refinement Step | Key Modifiers to Add | Result |
|---|---|---|
| 1. Subject | Specific nouns, actions, adverbs | Clear focal point and story |
| 2. Context | Environment, era, time of day | Coherent background and palette |
| 3. Style | Medium (oil, film), art movements | Consistent aesthetic "look" |
| 4. Composition | Camera angles, focal length, rules | Professional framing/staging |
| 5. Lighting | Rembrandt, volumetric, golden hour | Depth and photorealism |
| 6. Quality | Resolution, rendering engines | Sharpness and high-end finish |
| 7. Negatives | --no text, --no blur, bad anatomy | Removal of artifacts/errors |
| 8. Testing | Seed locking, denoising strength | Consistent, repeatable results |
For practical examples of these steps, check out curated prompt packs or use tools like the prompt refiner and prompt optimizer. Dive deeper into prompt creation strategies at the AI prompt design learning hub.
Example: Refining a Prompt from Start to Finish
This example demonstrates how refining a rough idea step by step can turn it into a polished, detailed instruction ready for production. It reflects the process of iterative improvement discussed earlier.
Before: Rough Prompt
"a dragon in a forest"
This initial prompt is too vague, leaving critical details like lighting, time of day, colors, setting, perspective, and artistic style undefined. The AI's interpretation is often random, resulting in outputs like a generic, cartoonish dragon in a bland setting with flat lighting [3].
After: Refined Prompt
"A majestic, red-scaled dragon with iridescent wing membranes perched on a moss-covered granite boulder in a misty ancient pine forest at dawn, volumetric god rays filtering through heavy atmospheric fog, low-angle wide shot following the rule of thirds, 1980s dark fantasy oil painting with visible brushwork, cinematic rim lighting, intricate scale textures, 85mm lens, f/2.8 aperture, --no blurry edges, extra limbs, watermark, text, deformed anatomy"
Here, the refinement process adds layers of specificity, addressing the subject, environment, lighting, composition, style, and even potential issues to avoid. The dragon is no longer generic; it’s a red-scaled creature with iridescent wings, perched on a mossy granite boulder. The setting is a misty pine forest at dawn, enriched with volumetric god rays and cinematic rim lighting. The composition is thoughtfully framed as a low-angle wide shot adhering to the rule of thirds, avoiding the default auto-centering [3].
The style is clearly defined as "1980s dark fantasy oil painting with visible brushwork", giving the artwork a handcrafted, human touch instead of the overly symmetrical look that AI sometimes produces [1]. Descriptive terms like "intricate scale textures" and camera settings such as an 85mm lens with an f/2.8 aperture ensure a high level of detail and quality [3].
This refined prompt eliminates guesswork, significantly improving the AI's output consistency. For more examples of detailed prompts, check out curated prompt packs or try the prompt refiner tool.
This process highlights how each refinement step contributes to crafting reliable, detailed prompts for AI art creation.
Using Prompt Packs as Refinement Templates
Curated prompt packs act more like flexible blueprints than fixed recipes, giving you a foundation to adapt and refine for your own projects. Think back to the essential structure: subject, action, environment, lighting, composition, style, camera, quality, and negatives. Professional packs showcase how to arrange these elements for consistent, production-ready prompts.
The key isn’t just copying the wording but understanding why a prompt works. For instance, analyzing a fantasy portrait pack might reveal that the creator prioritizes the subject early in the prompt ("24-year-old Scandinavian male, intense focused expression"). This aligns with the principle that early tokens carry more weight, as mentioned earlier [4]. You might also notice how specific lighting terms - like "cinematic rim lighting" or "volumetric god rays" - add depth and realism [3]. These patterns build your creative vocabulary, helping you craft more effective prompts across various models and styles.
Finding the Right Prompt Packs
You can explore curated prompt packs tailored to your specific model (Midjourney, Stable Diffusion, DALL·E, FLUX) and creative focus (fantasy, portraits, product shots, landscapes). For example, Midjourney works best with concise, impactful phrases, while Stable Diffusion benefits from detailed keyword clusters and carefully designed negative prompts [4][3]. Selecting packs that align with your workflow not only sharpens your results but also helps you create a go-to library for future projects.
Learning from Refined Structures
Treat each prompt pack as a learning tool. Break down its components - subject, environment, lighting, and camera settings - to understand how they work together. For example, how do camera settings like "85mm lens, f/1.8 aperture" create depth of field? This kind of reverse engineering can teach you essential techniques like the rule of thirds, leading lines, or using negative space [4].
Focus on the reasoning behind each element rather than memorizing phrases. If a pack uses "1980s dark fantasy oil painting with visible brushwork" to avoid the overly symmetrical look common in AI outputs [1], experiment by swapping "oil painting" with "watercolor" or "charcoal sketch." Lock the seed value during these tests to isolate how each modifier changes the result [4]. Over time, this process will help you build reusable templates and develop a sense of which details have the most impact. For extra support, you can use the prompt optimizer or explore resources on AI prompt design.
Saving and Organizing Your Refined Prompts
Refining your prompts is only part of the process - keeping them well-organized is just as important to maintain efficiency and creativity. Once you've polished a prompt, store it systematically or use editable prompt packs for future use. A clear and organized prompt library ensures you don’t waste time recreating what already works. Without this structure, you might find yourself sifting through scattered notes, trying to recall past successes. A good system keeps your best work at your fingertips.
Naming and Versioning Prompts
Create a consistent naming convention that captures the subject, style, version, and target model. For instance, a name like cyberpunk-hacker-cinematic-v4-flux immediately conveys what the prompt is designed for, its refinement stage, and the model it’s tailored to. Use labels to mark different stages of refinement, such as v1-core-idea, v2-composition, or v3-lighting-physics. This way, you can easily trace back to earlier iterations if needed, saving time and effort [3].
Building a Prompt Library
Once refined, prompts should be stored in a system that makes them easy to find and reuse. Organizing by project type - categories like "Product Mockups", "Portrait Presets", or "Landscape Templates" - can streamline your workflow [7]. You might also sort prompts by the AI model they work best with. For example, natural language prompts tend to perform better with FLUX and DALL·E 3, while keyword-heavy prompts are more effective for SDXL [4]. Additionally, maintaining a standard negative prompt list (e.g., "blurry, distorted, extra fingers") can help ensure quality across projects [3].
As your collection grows, consider tagging prompts with attributes like lighting, lens type, or color palette [6]. This tagging allows you to mix and match elements, such as combining a lighting setup from one prompt with the composition style of another. Over time, your library evolves into a dynamic toolkit, enabling you to work faster and maintain consistent quality across all your AI art projects.
FAQs
How do I know when my prompt is refined enough?
A well-crafted prompt achieves its purpose when it consistently directs the AI to generate precise, high-quality results with a clear focus on the subject, suitable style, and proper composition. If additional adjustments fail to enhance the output significantly or only introduce unnecessary complexity, it’s a strong indicator that your prompt is effectively optimized and ready to use.
What should I change first when an image looks wrong?
If an image isn’t turning out as expected, start by pinpointing the problem - whether it’s the subject, style, lighting, or finer details. Often, vague prompts are the culprit, so begin by sharpening or clearly defining the subject. Prioritize the main elements like subject clarity and style before moving on to tweak aspects like lighting or intricate details. By refining your prompt step by step, you’ll gradually achieve more accurate and polished results.
How do I reuse a refined prompt for new images?
To make the most of a refined prompt, save it as a template or reference and keep it well-organized. Use clear labels so you can quickly find and adapt it for future projects. When starting a new image, simply load your saved prompt, tweak elements like the subject, style, or composition to fit your needs, and run it again. This approach helps you maintain consistency and work efficiently, all while ensuring top-notch results.