If your AI-generated images look flat or poorly lit, photography-style prompt packs can help you achieve professional, studio-quality results. These packs use precise photography terms - like lens types, lighting setups, and depth-of-field details - to guide AI models like Midjourney, Stable Diffusion, or DALL·E. Instead of relying on vague prompts, you can quickly create polished photorealistic images, product shots, or thumbnails with consistent lighting and composition. This guide explains how these packs work, what makes them effective, and how to use them to improve your workflow.
What Makes a Photography-Style AI Prompt Pack
Studio Lighting Setups Guide for AI Image Generation
A photography-style AI prompt pack uses detailed technical language to replicate the precision of real-world photography. These packs incorporate elements like camera and lens details (e.g., Canon EOS R5, 85mm f/1.8), lighting setups (such as Rembrandt, softbox, or rim light), depth-of-field options (shallow bokeh or sharp f/8), and background treatments (like separation or studio backdrops). This structured approach aligns with how AI models are trained - on millions of professional photos tagged with these exact terms [4][6].
Core Components of Photography-Style Prompt Packs
A well-designed photography-style prompt pack typically includes these four key elements:
- Camera and lens combinations: Examples include a Sony A7R IV paired with a 50mm lens.
- Lighting setups: Specifications like a key light at 45 degrees, soft fill, or rim light for subject separation.
- Film stocks and color profiles: Options such as Kodak Portra 400 or Fuji Superia to emulate specific aesthetics.
- Composition techniques: Guidelines like the rule of thirds, centered framing, or environmental context [2][3].
Advanced packs go a step further, offering features like subsurface scattering (to simulate light passing through skin), ultra-detailed textures (with visible pores), and precise color accuracy for studio-level results [3]. For instance, the "Cinematic & Photography Master" pack boasts over 895.7 million possible variations by combining 12+ lighting setups with 20+ camera and lens options across 36 templates [3].
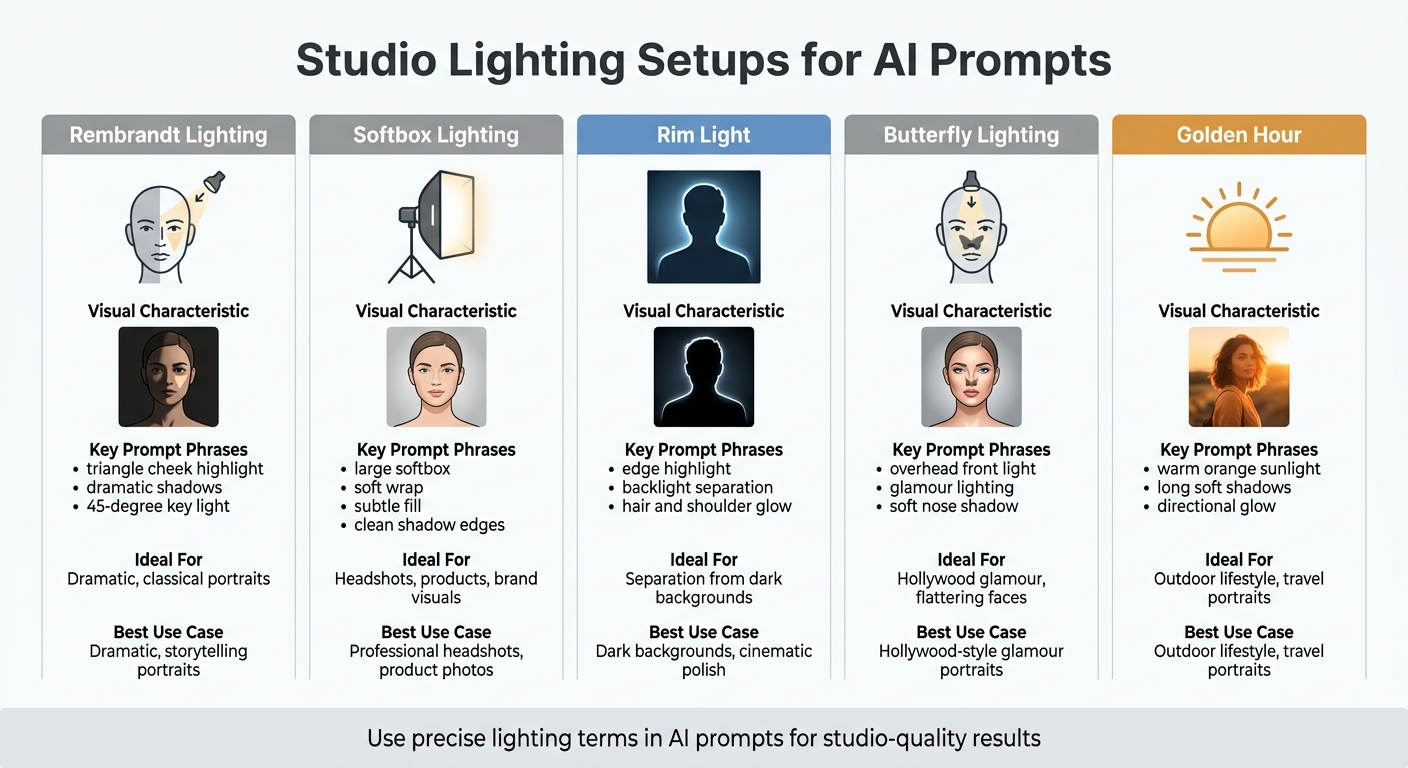
| Lighting Setup | Visual Characteristic | Ideal For |
|---|---|---|
| Rembrandt | Triangle of light on shadowed cheek | Dramatic, classical portraits [2][4] |
| Softbox | Soft, flattering light with gentle shadows | Headshots, products, brand visuals [2] |
| Rim Light | Bright edge highlight/outline | Separation from dark backgrounds [2][4] |
| Butterfly | Butterfly-shaped shadow under the nose | Hollywood glamour, flattering faces [4] |
| Golden Hour | Warm orange glow, long soft shadows | Outdoor lifestyle, travel portraits [4] |
These components enable creators to translate professional studio setups into AI prompts that deliver reliable results.
Why Studio Lighting Improves AI Images
Studio lighting plays a crucial role in enhancing AI-generated visuals. As Cemhan Biricik from ZSky.ai explains:
"A mediocre subject with great lighting produces a better image than a great subject with mediocre lighting" [4].
Lighting shapes the subject, adding depth, focus, and mood while eliminating the "flat" or "muddy" look often seen in amateur AI outputs. Erick from QuestStudio elaborates:
"If your AI images look flat, muddy, or randomly lit, it is usually not your subject. It is the lighting language" [2].
sbb-itb-997826f
Translating Real Studio Lighting into Prompt Formulas
This section focuses on turning real-world studio lighting setups into detailed prompt formulas for AI tools like Midjourney, Stable Diffusion, and DALL·E. By swapping vague terms like "cinematic" or "epic" for precise photography language, you can guide AI models to create images that mirror professional studio results. Techniques like Rembrandt lighting, softbox setups, or rim lighting can be translated into prompts that consistently yield high-quality visuals.
A well-structured prompt formula typically follows this sequence: Subject/Scene → Composition/Camera → Lighting Setup → Mood/Color → Quality/Constraints [2]. For instance, instead of saying "portrait with good lighting", you could write: "headshot, Canon EOS R5 with 85mm f/1.8, Rembrandt lighting with key light at 45 degrees, dramatic contrast, triangle cheek highlight, shallow depth of field." This level of specificity directs the AI to replicate the desired lighting and mood.
Details like lighting direction are crucial. Use phrases such as "key light at 45 degrees", "backlit", or "light from 2 o'clock position" to define the scene clearly. For multi-light setups, specify roles like key, fill, and rim lighting: "warm tungsten key from the left, soft daylight fill from the window, cool blue rim from the hallway."
Adjusting Lighting Setups for Midjourney, Stable Diffusion, and DALL·E
Each AI model interprets prompts differently, so fine-tuning is necessary to achieve consistent results. Midjourney benefits from adding technical parameters like --ar 4:5 for portraits and using flags such as --stylize or --quality to refine lighting effects. Stable Diffusion responds well to detailed camera and lens specifications, like "Sony A7 IV with 50mm f/1.2 GM," which influences sharpness and color tones. DALL·E, with its training on professional image datasets, understands terms from photography and cinematography directly.
To achieve specific looks, use terms such as "50mm lens, f/8 look" for sharp product shots or "85mm lens, shallow depth of field" for soft portrait backgrounds. Including film stock names like "Kodak Portra 400" or "CineStill 800T" can further shape color tones, grain, and skin texture.
Studio Lighting Examples in AI Prompts
Here are some examples of lighting setups and their corresponding prompts:
| Lighting Setup | Key Prompt Phrases | Best Use Case |
|---|---|---|
| Rembrandt | "triangle cheek highlight", "dramatic shadows", "45-degree key light" | Dramatic, storytelling portraits |
| Softbox | "large softbox", "soft wrap", "subtle fill", "clean shadow edges" | Professional headshots, product photos |
| Rim Light | "edge highlight", "backlight separation", "hair and shoulder glow" | Dark backgrounds, cinematic polish |
| Butterfly | "overhead front light", "glamour lighting", "soft nose shadow" | Hollywood-style glamour portraits |
| Golden Hour | "warm orange sunlight", "long soft shadows", "directional glow" | Outdoor lifestyle, travel portraits |
If your image seems flat, enhance it with prompts like "high contrast", "low key lighting," or "rim light separation." To soften harsh lighting, terms like "diffusion", "soft wrap," and "gentle falloff" are effective. For neon-lit scenes, adding "realistic skin tones" ensures natural-looking results without color distortion.
Prompt packs simplify this process by bundling these lighting formulas into ready-made templates. This saves time and ensures you can consistently produce studio-quality AI images while working from home.
Step-by-Step Workflow: From Flat Images to Studio‑Quality Shots
Transforming flat AI-generated images into professional-grade shots becomes much faster when you follow a structured workflow. The process centers on choosing the right prompt pack, testing its lighting setups, and organizing the successful results for future use. This method ensures consistency and helps you refine your approach over time.
Selecting a Photography-Style Pack
To start, pick a prompt pack that aligns with the type of images you want to create. For instance, portrait packs often focus on flattering lighting techniques like Rembrandt or Loop lighting, while product photography packs emphasize setups like softbox lighting or clean "floating" product arrangements. Make sure the pack is tailored to your AI model - whether it’s Midjourney, Stable Diffusion, or DALL·E - and your specific goals, such as commercial use, portfolio work, or social media content.
Good prompt packs provide precise instructions rather than vague suggestions. Instead of generic terms like "cinematic", they include detailed tokens for lighting direction, softness, and contrast. They also specify camera details, such as using an 85mm lens for portraits or a 50mm lens for product shots, to help you control depth of field and perspective alongside lighting.
When browsing photography-focused prompt packs, check whether the examples fit your needs. For portraits, explore portrait prompt packs. If you’re working on client projects or e-commerce, commercial-ready packs are designed to deliver polished, consistent results.
Using and Refining Lighting Recipes
After selecting a pack, follow this sequence: Subject, Composition, Lighting, Mood, Quality. For example, instead of a vague prompt like "portrait with good lighting", try something more specific: "headshot, Canon EOS R5 with 85mm f/1.8, Rembrandt lighting with key light at 45 degrees, dramatic contrast, triangle cheek highlight, shallow depth of field."
Use precise terms to describe lighting direction and quality, such as "45 degrees", "camera-left", or "rim light from behind", to ensure controlled results. For more complex lighting, layer different types - like warm practical lights with cool ambient blue light, or a rim light paired with a softbox. If the image looks flat, adjust by increasing contrast, reducing fill light, or adding a rim light for better separation between the subject and background. To soften harsh lighting, include terms like "diffusion", "soft wrap", or "gentle falloff."
Fine-tune your prompts based on the specifics of your AI model. If results aren’t as expected, tools like the AI Image Prompt Optimizer or a Negative Prompt Generator can help remove issues like overexposure or harsh shadows.
"Great prompts are not longer. They are more specific where it matters: camera, light direction, and contrast." - Erick, QuestStudio
To understand how each change affects the final image, tweak one variable at a time, such as light direction or lens type. This step-by-step approach ensures you can pinpoint what makes a difference.
Organizing and Reusing Successful Results
Once you’ve refined your prompts, save your best setups to streamline future projects. Build a prompt library that includes successful lighting configurations, such as "large softbox key light at 45 degrees, soft wrap", which can be easily reused with different subjects.
Organize your saved prompts by model (e.g., Midjourney, SDXL), style (e.g., Editorial, Cyberpunk), and purpose (e.g., Commercial, Social Media). Include technical details like aspect ratio, stylization, quality, and chaos settings alongside the prompt text to maintain consistency across sessions. For a cohesive portfolio or brand style, keep the subject description consistent while experimenting with lighting and environmental elements.
Analyze high-performing prompts to identify the tokens that control lighting, composition, and mood. Save these as templates or blueprints for future use. Before finalizing a "master" prompt, test it across different models to determine which one best captures your intended lighting style.
Choosing the Right Photography Pack for Products, Portraits, and Thumbnails
When working on creative projects like product shots, portraits, or thumbnails, selecting the right prompt pack can make all the difference. These packs act as guides, helping you achieve studio-quality results by aligning lighting styles and camera settings with your specific needs. Below, we break down the essentials for each type of photography.
Product Photography Packs
Product photography demands precision and consistency. Look for packs labeled "packshot" or "catalog-ready", which typically feature setups with clean white backgrounds (#FFFFFF), lenses like 50mm or 70mm to minimize distortion, and softbox lighting for smooth, controlled highlights. These packs often include negative prompts to avoid issues like "SKU drift", where the product’s shape or color changes unexpectedly, and to eliminate artificial-looking textures.
For e-commerce, the product should occupy roughly 70% of the frame, with sharp edges and realistic material rendering. Some commercial-ready packs even offer templates that let you tweak elements like background colors or lighting angles without altering the product itself. This ensures your images remain consistent and professional across multiple shots.
Portrait and Editorial Packs
Portrait packs are designed to highlight the subject with classic lighting techniques. Effective portrait prompt packs often recommend using 85mm lenses, which create a shallow depth-of-field and deliver the sought-after "creamy bokeh" effect, helping the subject stand out against the background.
"A mediocre subject with great lighting produces a better image than a great subject with mediocre lighting." - Cemhan Biricik, ZSky AI [4]
For editorial-style portraits, prioritize packs that incorporate rim lighting or backlight separation. These techniques add depth and dimension, giving portraits the polished, professional look that separates them from casual snapshots.
Thumbnails and Lifestyle Photography Packs
Thumbnails and lifestyle packs focus on creating visuals that grab attention instantly. These packs often feature vibrant lighting styles such as neon or golden hour effects, paired with 35mm lens emulations for a cinematic, natural perspective. Unlike product or portrait packs, lifestyle packs often include space for text overlays, making them ideal for platforms like YouTube or Instagram.
For thumbnails, choose packs that emphasize rim lighting or backlight separation to create a glowing effect around the subject. This technique enhances contrast, sharpens facial details, and ensures the subject stands out in a busy feed. When browsing photography-focused prompt packs, check that the examples align with your target platform’s visual style, whether it’s for social media, email marketing, or other uses.
| Use Case | Recommended Lighting | Recommended Lens | Key Visual Goal |
|---|---|---|---|
| Product/E-commerce | Softbox, Three-point, Top-down | 50mm, 70mm | Clean edges, realistic textures, no distortion |
| Portrait/Editorial | Rembrandt, Butterfly, Rim light | 85mm, 105mm | Flattering skin, sharp eyes, soft bokeh |
| Thumbnails/Lifestyle | Neon, Golden Hour, High-contrast | 35mm, 24mm | Vibrant colors, eye-catching energy, natural feel |
Fixing Common Lighting Issues with Prompt Packs and Negative Prompts
Expanding on the earlier focus on refining prompts, this section dives into solving frequent lighting problems using negative prompts. These prompts, also known as "hard exclusions", allow you to filter out unwanted elements without reworking your entire positive prompt. Even with a well-crafted photography-style prompt pack, lighting issues like harsh shadows or overexposed highlights can pop up. Negative prompts help fine-tune these flaws, turning flat or problematic outputs into images that resemble professional studio lighting.
"Fixing lighting isn't about a magic keyword - it's converting your prompt into a precise specification." - Ilia Ilinskii, Rephrase [5]
Removing Harsh Shadows or Overexposure
Harsh shadows and overexposed highlights are two of the most common pitfalls in AI-generated images. To tackle harsh shadows, include negative prompts like "no harsh shadows" or "no high contrast shadows". Pair these with positive instructions such as "soft diffused lighting," "soft wrap," or "gentle falloff" to create a more balanced look [2].
For overexposure, use exclusions like "no blown highlights" or "no overexposure" in your negative prompts. At the same time, refine your positive prompt by specifying "even exposure" or "controlled specular highlights" [5]. Tools like negative prompt generators and image prompt optimizers can help you craft precise strings to address these lighting issues.
| Lighting Issue | Negative Prompt / Exclusion | Recommended Positive Prompt Adjustments |
|---|---|---|
| Harsh Shadows | no harsh shadows, no hard shadows | soft diffused lighting, soft wrap, gentle falloff |
| Overexposure | no blown highlights, no overexposure | even exposure, controlled specular highlights |
| Flat/Muddy Look | no haze, no gray tones | clean highlights, deeper blacks, rim light |
Once lighting intensity is under control, refining composition and focus can further polish your results.
Controlling Depth, Focus, and Background Clutter
Even a well-lit image can feel chaotic if the background is cluttered or the focus is off. Use negative prompts like "no extra objects," "no clutter," or "no reflections showing a room" to clean up the scene [5]. For portraits, add positive prompts from a portrait prompts bundle such as "85mm lens, shallow depth of field" to create a blurred background, or use "50mm lens, f/8 look, studio sharpness" for product shots that need crisp focus across the frame [2].
To avoid the overly smooth "plastic" look in AI-generated faces, skip exclusions like "no blur" or "no plastic smoothing." Instead, include positive prompts like "realistic skin texture" or "micro-pores" for natural details [1][2]. For better subject separation, consider adding "rim light separation" or "backlight" to create a glowing edge that enhances depth and isolates the subject from the background [2].
Pro Tip: Place constraints and exclusions at the start of your prompt so the AI prioritizes them [5]. By refining your outputs through targeted adjustments rather than starting over, you can achieve polished, professional-quality results more efficiently.
Where to Find Photography‑Style Prompt Packs on Art Prompt HQ
Once you've addressed your lighting needs, the next step is finding prompt packs that deliver the precision of studio lighting. Art Prompt HQ simplifies this process by allowing you to filter by Models, Styles, and Goals, helping you pinpoint packs tailored to your AI tool, visual preferences, and project requirements. Here's how to efficiently navigate the platform to locate photography-focused packs.
Using Tags and Categories for Efficient Searches
To find photography-focused prompt packs, head to the Styles menu and select "Photography." This provides a curated list of packs. From there, you can refine your search by Model - whether you're using Midjourney, Stable Diffusion, DALL·E, or advanced video tools like Sora 2 and Veo 3. Additionally, filters for specific styles make it easy to locate packs featuring tokens for portrait lighting setups like 85mm lenses or soft studio arrangements. If you're working on product photography, combining the "Photography" filter with the Commercial goal tag will reveal packs designed for clean, professional backdrops and high-end product staging.
For added convenience, the platform offers a free AI Art Style Finder tool. This tool helps you test photography-related terms - such as "overcast diffused lighting" or "rim lighting" - before committing to a pack. It allows you to preview how specific lighting phrases align with your creative vision, ensuring you choose a pack that includes the formulas you need.
Browsing Featured Photography‑Style Packs
Art Prompt HQ organizes its packs as templates for achieving repeatable, studio-quality effects. Each pack is tested for reliability and includes detailed setups for lighting techniques like Softbox, Rim light, Rembrandt, and Butterfly lighting. When browsing, look for packs that mention studio-specific terms like "large softbox key light", "rim light separation", or "Rembrandt triangle" to ensure precise control over lighting. High-quality packs often include camera-related details, such as "85mm lens" for portrait prompts or "f/8 look" for sharp product shots, signaling their suitability for professional results.
"Packs double as teaching tools so you can see which tokens control style, lighting, composition, and mood." - Art Prompt HQ
Leveraging Additional Tools and Resources
Once you've chosen a pack, Art Prompt HQ offers tools to fine-tune your prompts and address common issues. The AI Image Prompt Optimizer lets you add technical details like aspect ratio, stylization, and quality settings to enhance your photography prompts. If you encounter issues like overexposure or harsh shadows, the negative prompt helper can generate exclusion strings to eliminate unwanted elements. These tools are free to use and integrate seamlessly with commercial-ready packs listed in the directory, helping you achieve polished, professional images.
Ready to dive in? Explore photography-style prompt packs or browse all categories to find the perfect pack for your lighting needs.
FAQs
What’s the minimum lighting language I should include in every prompt?
To create images with a professional studio look, make sure to include specific lighting terms in your prompts. Mention setups like Rembrandt lighting, softbox, rim light, or golden hour. Additionally, describe the light's direction, softness, and contrast. These details play a big role in achieving polished and consistent results in your AI-generated visuals.
How do I keep lighting consistent across Midjourney, Stable Diffusion, and DALL·E?
To achieve consistent lighting across various AI platforms, it's important to use precise and standardized lighting terminology in your prompts. Mention setups such as Rembrandt lighting, softbox key light, or golden hour warm light - these terms bring the clarity of studio lighting techniques into your AI-generated visuals. By structuring prompts to include details about the subject, scene, camera settings, and lighting, you can create results that are both uniform and predictable. For fine-tuning, tools like negative prompt helpers can help remove unwanted elements, further improving consistency across different models.
What negative prompts can fix flat, harsh, or overexposed lighting?
Negative prompts are a powerful way to address issues like flat, harsh, or overexposed lighting in AI-generated images. By clearly stating what to avoid - such as "no harsh shadows," "no overexposure," or "avoid flat lighting" - you can guide the model toward producing more visually pleasing results. Additionally, tools like negative prompt helpers can fine-tune these adjustments, helping to create images with more natural, balanced, and professional-quality lighting.