If blurry AI images are slowing you down, the fix is simpler than you might think. Whether you're using Midjourney or Stable Diffusion, blurry results often come from vague prompts, low resolution, or missed settings. This guide lays out seven practical steps to sharpen your outputs - from crafting better prompts to adjusting technical settings. With the right approach, you can consistently produce clear, high-quality visuals.
Let’s dive into the solutions, starting with prompt packs designed for sharper results.
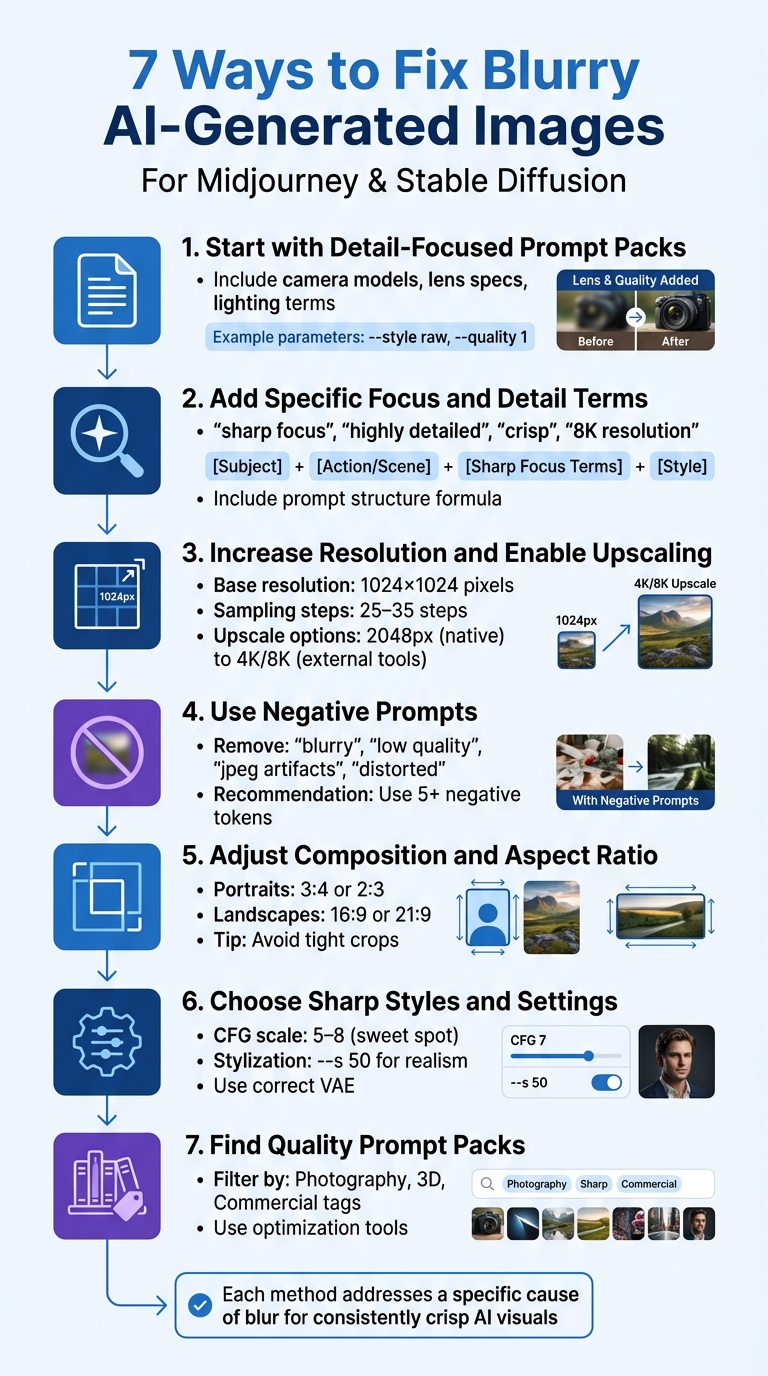
7 Methods to Fix Blurry AI-Generated Images in Midjourney and Stable Diffusion
Why AI Images Turn Out Blurry
If your AI-generated images often appear blurry, understanding the root causes can help you address the problem effectively. Most of the time, the blur results from either technical issues or unclear prompts. Here’s a closer look at the main factors behind blurry outputs:
Common Causes of Blur
Vague or incomplete prompts are a primary reason. Writing something like "a beautiful sunset" gives the AI very little to work with, unlike using photorealistic Stable Diffusion prompts designed for high-resolution detail. As Cemhan Biricik from ZSky AI explains:
The most common reason AI images look bad is the prompt itself. Most people write prompts the way they would describe something to another person... That gives the AI almost nothing to work with. [1]
Without specifics about elements like lighting, focus, or camera settings found in a Midjourney prompt pack, the AI struggles to generate sharp, detailed images.
Low resolution and insufficient sampling steps are another major factor. Most models are trained at resolutions like 1024×1024 pixels, so generating images below that can limit the model’s ability to render fine details. Similarly, using fewer than 20–25 sampling steps can leave the image looking soft or unfinished.
Incorrect or missing settings can also lead to blur. For example, a CFG (Classifier-Free Guidance) scale set below 3–4 often results in dull, unfocused images that don’t fully align with your prompt. Using the wrong Variational Autoencoder (VAE) can create a frosted-glass effect, where colors appear flat and details are soft. Additionally, choosing an unsuitable sampler may introduce noise that further reduces sharpness.
Neglecting negative prompts is another common mistake. Negative prompts are essential for telling the AI what to avoid, such as "blurry", "low quality", or "out of focus." Without these safeguards, the model may unintentionally include noise or artifacts that degrade the image.
Each of these issues has practical fixes, which are covered in detail in our guide. By addressing these factors, you can significantly improve the clarity and quality of your AI-generated images.
sbb-itb-997826f
7 Ways to Fix Blurry AI Images
Now that we’ve explored why images sometimes turn out blurry, let’s dive into seven practical ways to sharpen your outputs in Midjourney and Stable Diffusion. These methods address different stages of the creative process, from crafting better prompts to tweaking technical settings.
1. Start with Detail-Focused Prompt Packs
Using well-crafted prompt packs can make a significant difference in image clarity. These packs often include precise technical details and camera models (e.g., Sony a7R IV, Canon EOS R5), lens specifications (e.g., 85mm, Macro), and lighting terms like "HDR" or "volumetric lighting" to mimic professional photography [2][3]. Some also integrate parameters like --style raw or --quality 1 to reduce the overly smooth, artificial look often associated with AI-generated images [2].
If you’re looking for sharpness-focused options, Art Prompt HQ allows you to filter packs by model, style, or purpose. For instance, Midjourney prompt packs tagged with "photography" or "product" often emphasize clarity, while Stable Diffusion prompt packs may include negative prompts to eliminate blur and artifacts [1].
Starting with a pack designed for detailed results eliminates guesswork, giving you a solid foundation to build on.
2. Add Specific Focus and Detail Terms to Prompts
If your images lack sharpness, try incorporating terms like "sharp focus", "highly detailed", "crisp", "8K resolution," or "professional photography" into your prompts. These words guide the model to prioritize clarity.
Here’s a helpful structure for crafting prompts:
[Subject], [Style/Environment], [Detailed Description], [Camera], [Lens], [Composition], [Lighting] --[Parameters] [2].
For example, instead of a generic prompt like “a portrait of a woman,” you might use:
a portrait of a woman, studio environment, detailed skin texture, Canon EOS R5, 85mm lens, shallow depth of field, soft rim lighting --style raw --quality 1.
As Abby Poole, an AI enthusiast, explains:
Photography in Midjourney is akin to possessing a top-of-the-line camera and a mystical lens capable of capturing not only the present reality, but also the potential realities. [2]
Even small adjustments - like adding a few technical photography terms - can significantly enhance sharpness.
3. Increase Resolution and Enable Upscaling
Generating images at the native resolution of 1024×1024 pixels is a good starting point. Use 25–35 sampling steps to capture finer details, as using fewer than 20 steps often results in visible noise and soft edges. For Stable Diffusion, samplers like DPM++ 2M Karras or DPM++ SDE Karras are recommended for achieving detailed textures [1].
After creating your image, apply upscaling for even greater clarity. Midjourney’s native upscaler can expand images up to 2048px [2]. For higher-quality results - especially for professional or print purposes - external tools like Real-ESRGAN can upscale images to 4K, 8K, or even 32K while reducing noise and blur [2]. Abby Poole suggests:
The native upscaler costs GPU time very quickly. To upscale Midjourney photography images to higher quality in a budget-friendly way, you can use Aiarty Image Enhancer. [2]
Start with a high-resolution base image, then upscale externally for the best results.
4. Use Negative Prompts to Remove Blur and Noise
Negative prompts help eliminate unwanted elements like blur, artifacts, and distortions. A strong baseline for photorealistic images includes terms like:
"deformed, distorted, disfigured, poorly drawn, blurry, low quality, jpeg artifacts, oversaturated" [1].
Here’s a quick reference for tailoring negative prompts to specific goals:
| Goal | Recommended Negative Tokens |
|---|---|
| General Sharpness | blurry, low quality, lowres, jpeg artifacts, grainy |
| Clean Composition | watermark, text, signature, logo, border, frame |
| Realistic Textures | plastic, smooth, skin spots, oversaturated, airbrushed |
| Pixel Art Clarity | blurry, smooth gradients, 3d render, photorealistic |
If you’re unsure how to create effective negative prompts, tools like the AI Negative Prompt Generator can help.
Including at least five negative tokens focused on blur and quality can make a noticeable difference.
5. Adjust Composition and Aspect Ratio
The way you frame your subject can greatly influence how sharp the image appears. Using the right aspect ratio and giving your subject enough space can prevent images from feeling cluttered or soft.
In Midjourney, the --ar parameter lets you set aspect ratios (e.g., --ar 16:9). For portraits, vertical ratios like 3:4 or 2:3 often work best, while landscapes benefit from wider options like 16:9 or 21:9 [2].
Also, avoid overly tight crops. A medium shot with adequate negative space tends to look sharper and more balanced than a cramped close-up.
6. Choose Styles and Settings That Produce Sharp Results
Some styles and configurations naturally result in crisper images. Photorealistic styles, technical illustrations, and product photography packs often deliver better sharpness than painterly or abstract approaches.
For Midjourney, use lower stylization values (e.g., --s 50) to favor realism. Adjust the CFG (Classifier-Free Guidance) scale to around 5–8 for most models, as Cemhan Biricik from ZSky AI advises:
The sweet spot for most models is CFG 5–8. [1]
Be cautious with CFG values - too low (below 3–4) can make images soft, while too high (above 10–12) may cause over-sharpening or harsh color banding [1].
Additionally, ensure you’re using the correct VAE (Variational Autoencoder). An incorrect or missing VAE can make details look washed out. For older models, the vae-ft-mse-840000 file often improves detail and color [1].
How to Find Sharp Prompt Packs on Art Prompt HQ
Choosing the right prompt packs is a key step in achieving sharp, high-detail results. Art Prompt HQ simplifies this process with its directory, which allows you to filter by Models, Styles, and Goals. This makes it easier to find packs tailored specifically for sharpness and precision.
Start by selecting your model - whether it's Midjourney prompt packs or Stable Diffusion prompt packs. This ensures the packs are compatible with the model's syntax and include parameters for resolution and quality, like --quality 2 or specific LoRAs. Next, try the "Photography" style tag. These packs often include professional camera settings, such as "85mm lens" or "detailed skin texture", which are ideal for creating sharp imagery. The "3D" style tag is another excellent option, as it often features packs designed for high-contrast and sharp-edged renders.
For users aiming for polished, professional results, filtering by "Commercial" or "Portfolio" tags is a smart move. These packs are specifically crafted for consistency and clarity. As Art Prompt HQ notes:
Each pack is tested to produce a consistent visual style, not one‑off lucky generations [3].
Once you've chosen a pack, take advantage of Art Prompt HQ's free tools to fine-tune your prompts. Tools like the AI Image Prompt Optimizer or the AI Negative Prompt Generator can help you refine parameters for aspect ratio, stylization, and other details. This transforms a basic prompt into a well-structured instruction focused on sharpness.
Conclusion
Blurry AI images don’t have to be the norm. By using detail-oriented prompt packs, incorporating precise focus terms, working with higher resolutions, applying targeted negative prompts, mastering composition, fine-tuning settings, and relying on sharp preset libraries, you can consistently produce crisp visuals in tools like Midjourney and Stable Diffusion. Each of these approaches addresses a specific cause of blur, offering a practical and well-rounded workflow for achieving clarity.
As Cemhan Biricik explains:
The difference between amateur AI images and professional‑quality output comes down to understanding how these models interpret your instructions and knowing which settings actually matter [1].
These tips aren’t just theory - they’re actionable solutions to common problems. Skip the frustration of trial and error by starting with prompt packs that include camera tokens, lighting setups, and parameters designed for high-quality results.
Ready to upgrade your workflow? Explore Midjourney prompt packs and Stable Diffusion prompt packs on Art Prompt HQ, categorized by model, style, and purpose. Use the free AI Negative Prompt Generator to eliminate unwanted artifacts, or optimize your existing prompts for sharper, more detailed outputs. With the right tools and techniques, you’ll spend less time troubleshooting and more time creating visuals that truly stand out.
FAQs
What settings cause blurry Midjourney images?
Blurry images in Midjourney can stem from several factors, such as low sampling steps, selecting the wrong sampler, or relying on default low-resolution outputs. Skipping upscaling options can also lead to less defined visuals. Additionally, limited GPU memory or fragmented VRAM might force the model to compromise on resolution and detail, resulting in a lack of sharpness. To achieve clearer results, focus on adjusting settings, enable upscaling features, and manage GPU memory efficiently.
Which Stable Diffusion sampler and steps sharpen details?
The sampler and step settings in Stable Diffusion play a big role in determining image sharpness. DDIM and PLMS are two widely used samplers that strike a balance between speed and detail. For most cases, about 25 steps are sufficient to produce quality results. However, increasing the number of steps can help refine finer details. Early steps focus on building the composition, while later steps are key to enhancing sharpness. Choosing the right sampler and fine-tuning the steps can make a noticeable difference in image clarity.
Why do negative prompts reduce blur and noise?
Negative prompts play a key role in reducing blur and noise by telling the AI model what not to include during image creation. Using terms like "blurry", "low res", "noisy", or "jpeg artifacts", you steer the model toward producing sharper and cleaner visuals. This approach helps filter out undesirable elements, leading to a clearer and more polished final result.