If you’re struggling with inconsistent or unnatural portraits in Stable Diffusion, prompt packs are the solution. These curated prompts help you achieve lifelike results by mimicking professional photography techniques - like using specific lenses, lighting setups, and detailed subject descriptions. Whether you’re creating stylized portraits, corporate headshots, or social media thumbnails, prompt packs save time and deliver reliable, high-quality images.
This guide explains how to use portrait prompt packs effectively, refine your results with negative prompts, and fix common issues like overly smooth skin or distorted features. Let’s dive into how these tools can level up your workflow.
What Photorealistic Portraits Mean in Stable Diffusion

Creating photorealistic portraits in Stable Diffusion isn’t just about throwing in terms like "8k ultra HD" or boosting resolution. It’s about achieving believability - the fine line between a portrait that feels like it came from a professional photographer and one that looks like an artificial, lifeless mannequin.
As Cemhan Biricik from zsky.ai explains, "Portraits are the hardest category of AI image generation to get right... Humans have evolved to be extraordinarily sensitive to faces. We notice the tiniest asymmetry in eyes, the slightest wrongness in skin texture, and any unnatural proportions" [3].
To guide Stable Diffusion toward photorealism, there’s a specific formula to follow: [Subject Description] + [Camera Angle & Lens] + [Lighting Condition] + [Skin Texture Keywords] + [Film Stock/Style]. For instance, using a prompt like "shot on Sony A7R IV, 85mm lens, f/1.8" doesn’t just define the subject but also influences the background blur (bokeh), depth of field, and overall photographic quality. While these technical details are essential, embracing natural imperfections is just as important.
Subtle flaws are what make portraits feel real.
Wright, a content strategist at AI Creative Blog, points out, "the beauty of realistic AI art lies in the flaws" [1].
For skin to look realistic, it needs natural texture and slight variations, steering clear of an overly smooth or plastic-like finish. Lighting plays a critical role here - techniques like Rembrandt lighting or rim lighting can add dimension and depth. Additionally, sharp focus on the eyes, detailed irises, and glossy highlights help avoid the dreaded "dead eye" effect, bringing life and emotion to the portrait.
In practical terms: Photorealism comes from prompts that mimic real-world physics - capturing light, texture, and the behavior of professional camera optics. It’s not just about adding detail; it’s about combining technical precision with natural, human-like imperfections. Understanding these principles is essential when choosing or designing prompt packs for portraits that deliver consistently professional results.
sbb-itb-997826f
How Portrait Prompt Packs Are Structured (and Why It Matters)
Portrait prompt packs are carefully designed with a hierarchical structure that aligns with how Stable Diffusion processes tokens.
As gptprompts.ai explains, "Stable Diffusion doesn't see sentences - it sees tokens. To rank as a power user, your prompt structure must follow hierarchical logic" [2].
The recommended formula is: [Subject] + [Action/Pose] + [Environment] + [Lighting/Mood] + [Camera/Technical] + [Style]. This order is crucial because Stable Diffusion prioritizes the first tokens in the sequence [6].
High-quality portrait prompt packs break down this structure into modular components, allowing creators to swap details like lighting or lens specifications without losing the overall coherence of the image. This approach helps achieve realistic results, avoiding issues like distorted faces or overly smooth, artificial skin. The outcome is portraits that look like they were captured by a professional camera, not generated randomly. Let’s explore how each component contributes to this process.
Subject Descriptors in Prompt Packs
Subject descriptors define who is in the portrait, addressing common issues like "generic AI face syndrome", where faces appear unnaturally smooth and featureless. These descriptors include details such as age, ethnicity, physical traits, and even micro-features like "freckles", "braided hair", or "rugged beard." For instance, instead of simply specifying "woman", a prompt might use "25-year-old Norwegian with freckles and loose auburn hair." This level of specificity enhances realism and prevents generic outputs.
Expressions are handled with similar precision. Instead of vague terms like "happy", prompts describe physical details, such as "slight upward curve at the corners of the mouth, relaxed brow." This avoids the uncanny valley effect, where emotions appear unnatural or robotic. Advanced packs may even incorporate prompt scheduling syntax, such as [person1 : person2 : factor], to blend features from two identities and create unique, consistent faces across multiple renders [4][5].
Camera and Lens Specifications
Camera and lens details play a key role in achieving photorealism. The focal length, for example, impacts how the subject’s face appears. An 85mm or 100mm lens is ideal for portraits, as it naturally flattens facial features and creates a soft background blur (bokeh) that separates the subject from the environment [1]. A 35mm lens, on the other hand, is better for capturing more of the surroundings, making it suitable for candid or street-style shots.
Aperture settings like f/1.8 or f/2.8 further enhance depth of field, keeping the subject sharp while softly blurring the background. Some packs even specify camera models, such as "shot on Sony A7R IV" or "Canon EOS R5", to guide the AI toward high-quality sensor and color reproduction. These aren’t just decorative details - they instruct Stable Diffusion on how to handle light and focus in the final output.
Lighting and Environment Modifiers
Lighting setups add depth and mood to portraits. Examples include Rembrandt lighting (a dramatic triangle of light on the cheek), Golden Hour (warm, soft sunlight), or rim lighting (backlighting that creates a glowing outline around the subject). These techniques elevate the image, making it more dynamic and professional.
Environment modifiers anchor the subject in a believable setting. Instead of using generic backdrops, prompts might specify "misty forest", "neon-lit street", or "studio with soft gray backdrop." These details affect how light interacts with the subject’s skin and how shadows are cast, creating a sense of realism. For scenes with backlighting, terms like subsurface scattering are often included to simulate how light penetrates translucent skin, giving ears and cheeks a natural glow [1].
Style and Detail Enhancers
The final layer of a portrait prompt focuses on style and fine details, which push the image from "good" to lifelike. Keywords like "raw photo", "8k UHD", "DSLR," and "visible pores" guide the AI to produce high-resolution, realistic images [1][4].
As Wright from AI Creative Blog notes, "The dead giveaway of AI art is 'perfect skin.' Real humans have pores, peach fuzz, and discoloration. You must explicitly ask for these defects" [1].
Film stock references, such as "Kodak Portra 400" or "Fujifilm XT3," add analog-style grain and color grading, giving the portrait a cinematic touch. Some packs also use token weighting, like (keyword:1.4), to emphasize specific features, such as "sharp focus on eyes" or "weathered skin" [2]. These subtle imperfections make the portrait feel more human and less artificial.
In practice: A structured prompt pack provides a reliable framework where every element - subject, camera, lighting, and style - works together to create portraits that are consistent and believable. By following a tested system, creators can focus on refining their vision instead of experimenting with random keywords.
Choosing the Right Portrait Pack for Your Use Case
Portrait packs are not one-size-fits-all. A pack designed for corporate headshots focuses on clean, neutral aesthetics, while a cinematic portrait pack leans heavily into dramatic visuals. Picking the wrong pack can lead to frustrating results, as you'll end up fighting the AI's default tendencies instead of enhancing your creative output. The key is to match the pack to your specific goals.
For commercial headshots or professional photography, look for packs that prioritize studio lighting setups like "softbox" or "Rembrandt lighting." These often produce smooth facial features and create a pleasing bokeh effect that separates the subject from the background. Such packs usually recommend vertical aspect ratios like 2:3 (e.g., 832 x 1248) to ensure the subject’s head isn’t awkwardly cropped. They also include neutral background options like "light gray backdrop" or "charcoal studio wall", keeping the focus on the subject without distractions.
If you’re working on lifestyle imagery or social media thumbnails, choose packs that emphasize a candid, natural vibe. Prompts in these packs often feature terms like "Golden Hour", "natural window light", or "neon-lit street" to create vibrant and relatable visuals. Since social media platforms often require specific formats, these packs typically support square ratios (1:1) for profile pictures or widescreen formats (16:9) for YouTube thumbnails, ensuring your visuals fit perfectly.
For cinematic portraits, opt for packs that reference iconic film stocks like "Kodak Portra 400" or "Cinestill 800." These packs focus on creating mood and texture, incorporating elements like "chiaroscuro", "volumetric fog", or "rim lighting." They often suggest widescreen formats like 2.39:1 or 16:9 to frame the subject in a more narrative-driven way. Additionally, they include details like "film grain" and "subsurface scattering" to avoid an overly polished or artificial appearance, lending a more authentic cinematic feel to the final image.
Step-by-Step Workflow Using Portrait Prompt Packs in Stable Diffusion
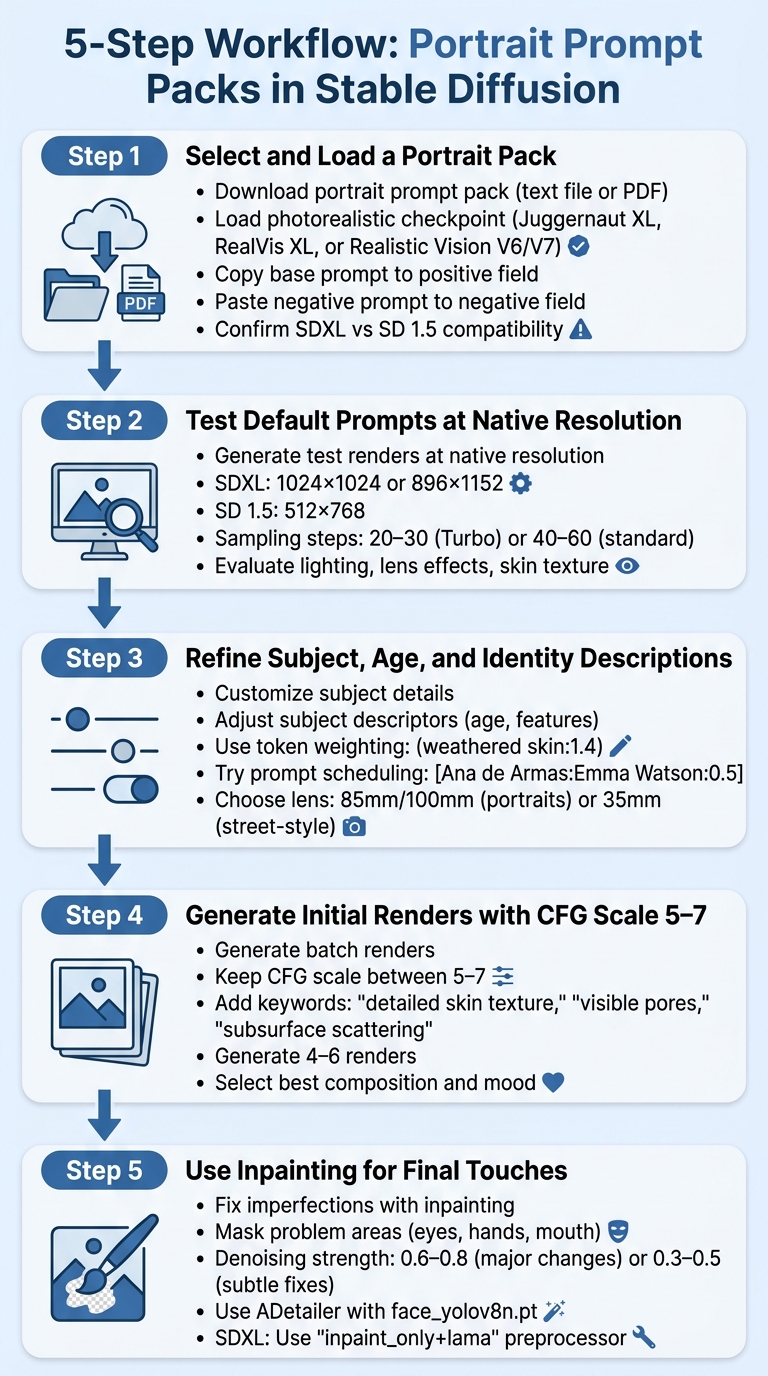
5-Step Workflow for Creating Photorealistic Portraits in Stable Diffusion
Once you've picked a portrait prompt pack that suits your project, it's time to put it into action. Following a structured workflow helps you avoid unnecessary renders and move systematically from an initial draft to a polished, lifelike portrait. The process involves testing the pack's default settings, refining the subject, and using techniques like inpainting to address any imperfections. By sticking to this approach, you can consistently achieve photorealistic results.
Step 1: Select and Load a Portrait Pack
Begin by downloading a portrait prompt pack that fits your creative needs. These packs usually come as text files or PDFs with base prompts, negative prompts, and suggested settings. Open your Stable Diffusion interface, such as Automatic1111 or ComfyUI, and load a photorealistic checkpoint like Juggernaut XL, RealVis XL, or Realistic Vision V6/V7. These models are designed to handle realistic skin textures and lighting effectively [1]. Copy the base prompt into the positive field and paste the negative prompt into its respective field. Ensure the pack specifies whether it’s for SDXL or SD 1.5, and confirm your chosen checkpoint matches to avoid issues with resolution or quality.
Step 2: Test Default Prompts at Native Resolution
Before making adjustments, generate a few test renders using the pack's default prompts at the model's native resolution. This step shows how the pack performs straight out of the box. For SDXL models, use resolutions like 1024×1024 or 896×1152 (portrait orientation). For SD 1.5, stick to 512×768 to avoid duplicated features [1]. Adjust sampling steps to 20–30 for Turbo models or 40–60 for standard models to capture finer details [1]. These test renders help you evaluate the pack’s strengths - such as lighting, lens effects, and skin texture - and pinpoint areas for improvement.
Step 3: Refine Subject, Age, and Identity Descriptions
Next, tweak the subject details to align with your creative vision. Adjust the subject descriptor, for instance, changing "young woman" to "middle-aged man with weathered skin" by using token weighting like (weathered skin:1.4) [2]. For creating unique identities, experiment with prompt scheduling syntax such as [Ana de Armas:Emma Watson:0.5], which blends references during the rendering process [4]. Avoid using real celebrity names in final outputs; these should only serve as placeholders for testing. For lens settings, choose 85mm or 100mm for traditional portraits with blurred backgrounds, or 35mm for a more dynamic, street-style aesthetic [1][9].
Step 4: Generate Initial Renders with CFG Scale 5–7
Once your subject and camera settings are ready, generate a batch of renders while managing the CFG scale. Keeping the scale between 5 and 7 ensures realistic results [1]. Higher scales (above 10) can oversaturate colors and erase fine details, while lower scales (below 5) may cause the AI to stray from your prompts [1]. To enhance skin realism, include keywords like "detailed skin texture", "visible pores", "subsurface scattering," and "peach fuzz" to avoid overly smooth, artificial-looking skin [1][2]. Generate 4–6 renders at this stage and pick the ones that best capture your intended composition and mood. Once satisfied, move on to inpainting for final adjustments.
Step 5: Use Inpainting for Final Touches
Even with a solid prompt pack, initial renders often have small flaws, such as distorted hands, unnatural eyes, or odd expressions. Use the Inpaint tab to address these issues. Mask the problem areas (e.g., eyes, hands, or mouth) and adjust the denoising strength - set it high (0.6–0.8) for noticeable changes or low (0.3–0.5) for subtle fixes [7]. Tools like ADetailer with models such as face_yolov8n.pt can refine facial features, though they may slightly alter the identity [7]. For SDXL, the "inpaint_only+lama" preprocessor in ControlNet is particularly effective at blending corrections seamlessly into the image, enhancing details like eyes, hair, and skin texture [7].
Using Negative Prompts and Upscaling for Cleaner Results
Once you've completed the initial renders and made any necessary inpainting adjustments, the next step is to focus on negative prompts and upscaling. These tools work together to refine your images, eliminating the "AI look" and adding realistic details. Negative prompts help the AI avoid specific issues, while upscaling enhances textures and introduces lifelike features. Together, they can transform a decent portrait into something that feels truly photorealistic, with natural textures in skin, eyes, and hair.
Core Negative Prompt Components
A good negative prompt addresses three key problem areas: anatomical defects, aesthetic inconsistencies, and technical flaws. To tackle anatomical issues, include terms like "extra limbs", "fused fingers", "bad anatomy", "deformed face," and "cross‑eyed"[1][3]. For a more natural look, avoid terms such as "plastic skin", "smooth skin", "doll," and "airbrushed." These encourage the AI to include natural imperfections like pores and fine lines instead of producing overly smooth, artificial surfaces[1].
To eliminate technical issues, add phrases like "blurry", "low quality", "watermark," and "text" to your negative prompt[2][3]. For professional headshots, you can go a step further by including terms like "harsh shadows", "red eye," and "blemishes" to ensure a polished, studio-quality finish[3]. Many portrait prompt packs already include well-rounded negative prompts, but you can customize them to fit your specific needs. For instance, if you're aiming for a film-like aesthetic, you might leave out terms like "grainy."
"The 'Negative Prompt' box is where you tell the AI what to avoid." – Wright, Content Strategy Specialist, AI Creative Blog [1]
Upscaling Passes with SDXL Models
After refining your negative prompts, upscaling becomes the key to adding the fine details that bring your portraits to life. Upscaling is particularly important for close-ups, as it enhances textures in areas like the eyes and hair. Tools like Hires. Fix in Automatic1111 or Forge work by generating an image at a lower resolution and then upscaling it, ensuring the final result includes intricate textures and avoids a synthetic appearance[1].
When upscaling, it's important to keep your CFG scale between 5 and 7 - higher settings can oversaturate colors, while lower settings may blur the image[1]. For SDXL Turbo models, 20–30 sampling steps are typically enough, whereas older models might need 40–60 steps to achieve similar detail[1]. Using specialized checkpoints like Juggernaut XL or Realvis XL, which are optimized for realistic lighting and skin textures, can further enhance the upscaling process[1][9].
Detail Enhancement Techniques
To push realism even further, consider adding specific keywords to your prompt. For example, "subsurface scattering" can simulate how light interacts with translucent skin, creating a natural glow on areas like ears and cheeks[1]. This prevents the subject from appearing too smooth or artificial. Additional terms such as "detailed skin texture", "visible pores", "skin imperfections," and "peach fuzz" can help emphasize lifelike details[1].
"Subsurface Scattering is a technical term for how light penetrates translucent skin. Adding this keyword makes ears and cheeks glow red when backlit, adding a massive layer of realism." – Wright, Content Strategy Specialist, AI Creative Blog [1]
For even more refinement, you can use detail-enhancing LoRAs like add_detail, hairdetailer, or DetailedEyes_V3 during the upscaling process[8]. Additionally, photography-focused prompt packs often include modifiers like "high dynamic range (HDR)", "4k raw photo," and "hyperdetailed" to elevate realism further[2][1]. If artifacts persist after upscaling, tools like the negative prompt helper can create custom negative prompts tailored to your needs.
Common Mistakes with Portrait Packs (and How to Fix Them)
Even with well-designed portrait prompt packs, certain challenges can arise. One of the most common issues is overly smooth, mannequin-like skin. This happens because AI models often default to smooth textures to create visually appealing results. Unfortunately, this approach overlooks the natural imperfections that make skin look realistic. To address this, include specific keywords like "pores", "skin texture," or "subsurface scattering" in your prompts. These terms help the model add authentic details and realistic textures.
Another frequent problem is distorted anatomy or generic facial features. Vague prompts like "a woman" often lead to repetitive, bland faces or unnatural expressions. You might also encounter artifacts such as extra fingers, fused limbs, or asymmetrical features. To avoid these issues, refine your negative prompts with terms like "bad anatomy", "extra limbs," or "fused fingers". Additionally, be more specific when describing your subject - include details like age, nationality, or distinctive features. If these problems persist, you can use Inpainting to fix distortions. Mask the flawed area and regenerate it with a denoising strength of around 0.75 for better results.
"Portraits are the hardest category of AI image generation to get right, and also the most rewarding when you nail them. Humans have evolved to be extraordinarily sensitive to faces." – Cemhan Biricik, ZSky AI
Oversaturated or "burned" images are another telltale sign of a misstep, often caused by setting the CFG (Classifier-Free Guidance) scale too high. When the CFG scale exceeds 12, the model adheres too strictly to your prompt, leading to harsh contrasts and unnatural colors. To achieve more balanced and photorealistic results, keep the CFG scale between 5 and 7. On the flip side, setting it too low (below 2) can result in blurry, poorly defined images.
Improper aspect ratios can also ruin a portrait, often leading to cut-off heads or awkward framing. To avoid this, use vertical aspect ratios such as 512×768 for SD 1.5 or 896×1152 for SDXL. Additionally, neglecting lighting modifiers can make your images look flat and artificial. Incorporate terms like "rim lighting", "softbox lighting," or "Rembrandt lighting" to give your portraits depth and a professional finish.
| Issue | Likely Cause | Recommended Fix |
|---|---|---|
| Overly Smooth Skin | Missing texture keywords | Add "pores", "skin texture", "subsurface scattering" |
| Distorted Eyes/Limbs | Lack of negative constraints | Use negative prompts: "bad anatomy", "extra limbs", "fused fingers" |
| Oversaturated Colors | High CFG scale | Lower CFG scale to 5–7 |
| Cut-off Heads | Incorrect aspect ratio | Use vertical ratios (e.g., 2:3 or 3:4) |
| Generic "AI Face" | Vague subject description | Specify age, nationality, and unique features |
Where to Find Photorealistic Portrait Prompt Packs on Art Prompt HQ
If you're working on creating lifelike portraits, Art Prompt HQ is a fantastic resource to find the right prompt packs. The platform organizes its photorealistic portrait prompt packs by style and technical details, making it simple to locate what you need. Check out their dedicated portrait prompt packs section, which features collections tailored for Classic Studio, Environmental, Lifestyle, Street, Fine Art, and Documentary portraits. Each pack includes tags that outline its technical specs, helping you quickly identify the best fit for your project.
For tasks like commercial headshots or product-focused portraits, the photography-focused portrait bundles is worth exploring. These packs are sorted by AI model compatibility, such as SDXL or SD 1.5, ensuring you're equipped with prompts that align with your tools.
To make your workflow even smoother, take advantage of the negative prompt helper. This tool generates negative prompts to address common issues like plastic-looking skin, anatomical errors, or unwanted extra limbs. By incorporating this tool with any prompt pack, you can achieve cleaner, more polished results without spending extra time on manual edits.
When you're ready to dive deeper, explore the full library of Stable Diffusion prompt packs or browse through all guides for additional tips and tutorials. Art Prompt HQ’s well-organized structure - sorted by model, style, and use case - ensures you can focus on generating stunning, photorealistic portraits instead of getting bogged down in endless searches.
FAQs
What’s the fastest way to keep faces consistent across multiple portrait renders?
The quickest method to maintain consistent faces in Stable Diffusion is through seed locking paired with prompt-based strategies. Seed locking ensures that the same random seed is used for every render, preserving facial features across images. When combined with detailed subject descriptions, carefully crafted prompts, and negative prompts, this approach significantly improves consistency. For those seeking even more refined results, tools like LoRA models can be employed to encode specific faces or characters, ensuring their appearance remains uniform across various images.
How can I avoid 'plastic skin' without introducing noise or grit?
To avoid the unnatural look of 'plastic skin' in photorealistic portraits, focus on prompts that highlight realistic skin characteristics. Phrases like 'visible vellus hair,' 'skin unevenness,' and 'subsurface scattering' can bring out natural textures. Pair these with lighting setups such as 'soft diffused light' to enhance the skin's authentic appearance. Additionally, using negative prompts can help eliminate overly smooth or artificial features. When combined with upscaling, these strategies ensure detailed, lifelike skin without introducing unnecessary noise or distortion.
When should I use inpainting vs upscaling to fix portrait problems?
Use inpainting to address specific problems such as warped faces, distorted hands, or missing elements in your image. This technique allows you to focus on and improve particular areas without affecting the rest of the composition. On the other hand, upscaling is best applied after generating the image to boost resolution and sharpen its overall quality. While inpainting fixes localized imperfections, upscaling enhances the entire image, giving it a refined and polished look.